-
Student
-
Teacher
-
Auto-marking
-
Coding
-
-
- Generate a Option List
- Deselecting All Options
- Choosing All Options
- Deselect Some Options
- Select Some Options
- Getting Options that are Selected
- Changing the Option List Size
- Drop Down List With Multiple Selections
- Checking Option List is Multiple or Not
- Setting Multiple Choices in Option List
- Getting All Options
-
-
- Changing Margins
- Creating Space Around the Variable in Different Side
- Border Radius Width
- Changing Minimum Height
- Changing the Height of Variable or Layout
- Changing Maximum Width
- Changing Minimum Width
- Changing the Width of Variable or Layout
- Self Alignment Property
- Fitting the Space Available in Flex Container
- Flex Shorthand Property
- Changing Maximum Height
-
-
-
-
-
-
-
- Adding Two Values
- Subtracting two numbers
- Multiplying two numbers
- Dividing two numbers
- Setting a Number
- Showing Remainder Between Two Numbers
- Finding the Minimum Values
- Finding the Maximum Values
- Changing the Number to Absolute Value
- Taking the Square Root
- Converting the Number to an Approximate Value
- Choosing the Random Value
-
-
-
- Breaking Text with Separators
- Checking Whether the Text Contains Characters
- Finding the Position of the Character
- Checking Text is Empty or Not
- Showing Text in Substring Format
- Showing the Order of Characters in Two Texts
- Displaying Character at the Certain Position
- Using Character Code to Show Text
-
-
- Converting Text to DateTimeOffset Format
- Generate a DateTimeOffset with Different Unit
- Generate DateTimeOffset Using Unix Time
- Using the Current Time to Display DateTimeOffset
- Combining a New Offset with DateTimeOffset
- Modifying Offset
- Changing the Format of DateTimeOffset to Text Format
- Converting DateTimeOffset to Text Format
- Adding DateTimeOffset with Duration
- Calculating the Duration Between Two DateTimeOffsets
- Checking Whether DateTimeOffsets are the Same
- Showing DateTimeOffset in Milliseconds
- Showing DateTimeOffset in Different Time Format
- Checking Whether DateTimeOffset is in Correct Type
-
- Converting Text to Duration
- Transforming Number to Duration
- Converting String to Duration
- Making Opposite Duration
- Adding Two Durations
- Changing the Duration Unit
- Checking Whether Two Durations are the Same
- Displaying Total Number of Duration in Different Units
- Showing Duration in Number Format with Unit
- Checking Whether Duration is in Correct Data Type
-
-
Coding - Pi
-
-
-
-
- Adding Two Values
- Subtracting two numbers
- Multiplying two numbers
- Dividing two numbers
- Setting a Number
- Showing Remainder Between Two Numbers
- Finding the Minimum Values
- Finding the Maximum Values
- Taking the Square Root
- Converting the Number to an Approximate Value
- Changing the Number to Absolute Value
- Choosing the Random Value
-
-
- Transforming Text to Number
- Concatenating the Text
- Checking the Length of Text
- Setting Text
- Breaking Text with Separators
- Checking Whether the Text Contains Characters
- Finding the Position of the Character
- Checking Text is Empty or Not
- Showing Text in Substring Format
- Showing the Order of Characters in Two Texts
- Displaying Character at the Certain Position
- Using Character Code to Show Text
-
-
-
- Converting Text to DateTimeOffset Format
- Generate a DateTimeOffset with Different Unit
- Generate DateTimeOffset Using Unix Time
- Using the Current Time to Display DateTimeOffset
- Combining a New Offset with DateTimeOffset
- Modifying Offset
- Changing the Format of DateTimeOffset to Text Format
- Converting DateTimeOffset to Text Format
- Calculating the Duration Between Two DateTimeOffsets
- Adding DateTimeOffset with Duration
- Checking Whether DateTimeOffsets are the Same
- Showing DateTimeOffset in Milliseconds
- Showing DateTimeOffset in Different Time Format
- Checking Whether DateTimeOffset is in Correct Type
-
- Converting Text to Duration
- Transforming Number to Duration
- Converting String to Duration
- Making Opposite Duration
- Adding Two Durations
- Changing the Duration Unit
- Checking Whether Two Durations are the Same
- Displaying Total Number of Duration in Different Units
- Showing Duration in Number Format with Unit
- Checking Whether Duration is in Correct Data Type
-
-
-
- Loading Custom Pose Model from URL
- Classifying Pose on Image
- Classifying Pose on Image and Get All Result
- Showing the Class Labels in Pose Model
- Showing the Total Amount of Classes with Pose Model
- Draw All Skeleton and the Key Points
- Draw All Skeleton Inside a Photo
- Draw All Key Points Inside a Photo
How to Upload and Release Automated Grading and Feedback Questions?
「UnaGPT」AI Auto-marking Free Trial
1. Change interface language (Optional)
- Go Una’s Login Page: https://app.una.study/
- Log in to the platform using a teacher account (Detailed instructions: user-manual/teacher/teacher-getting-started/teacher-login)
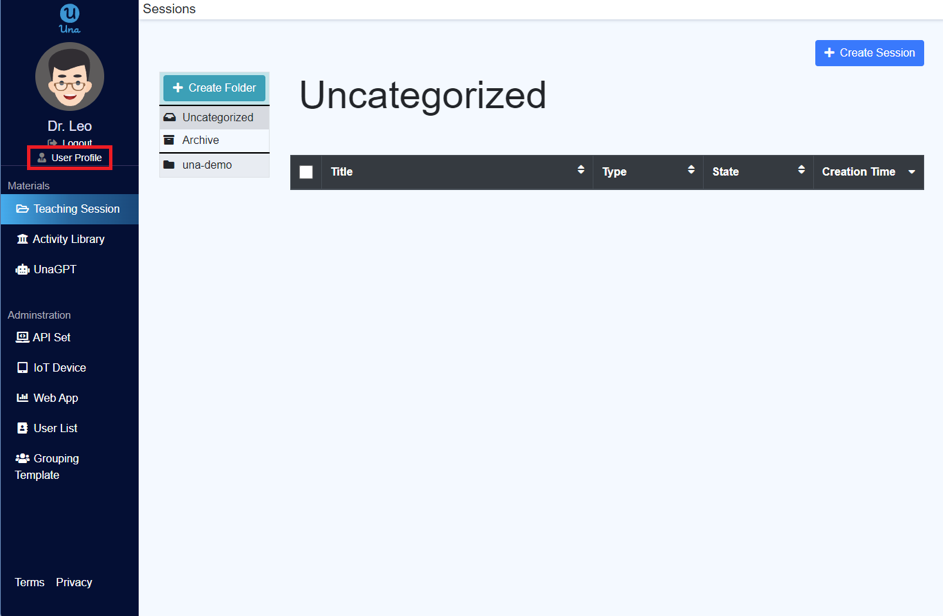
- Click “User Profile”.
- Choose another language.

2. Create AI auto-grading and feedback activity
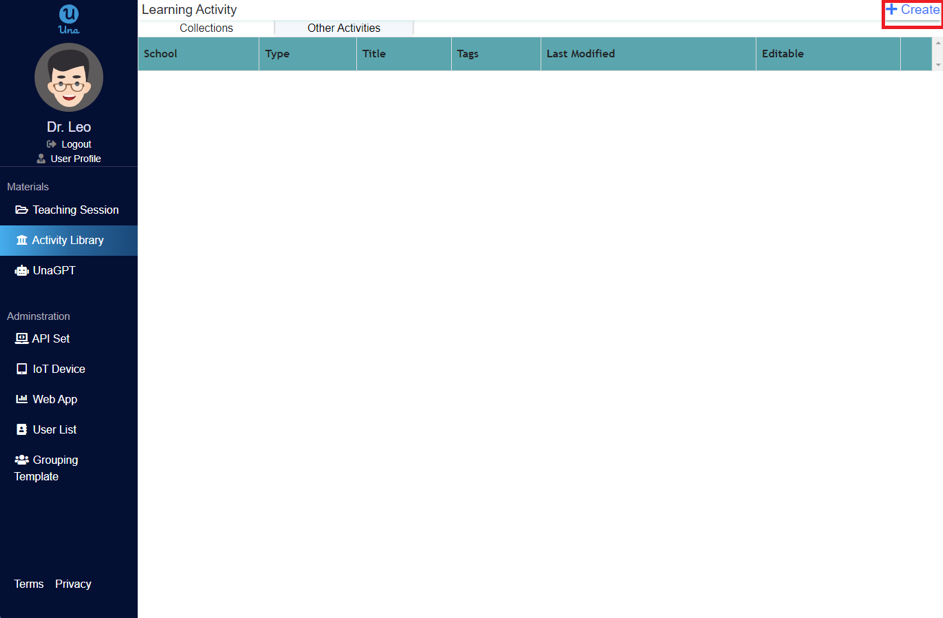
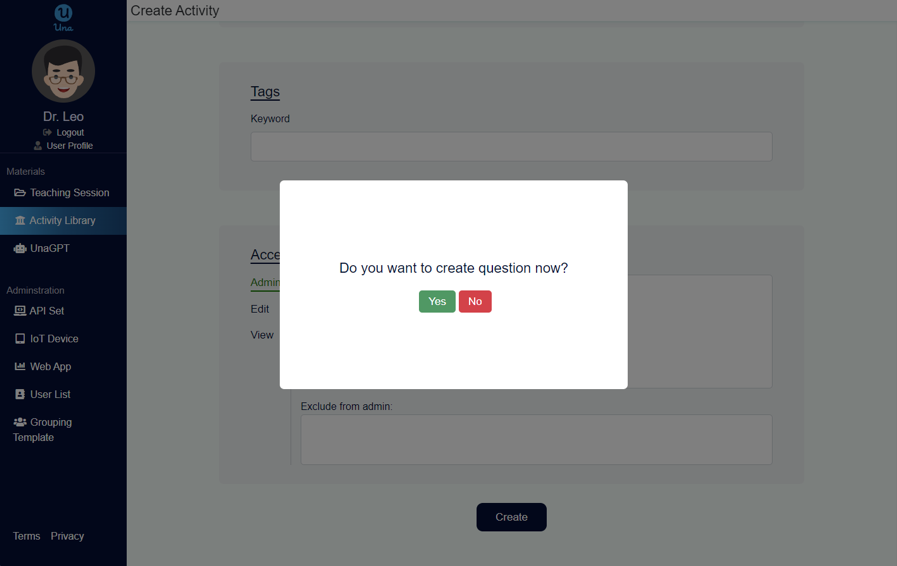
- Click “Activity Library” on the left menu, then click the “Create” button on the top right corner.
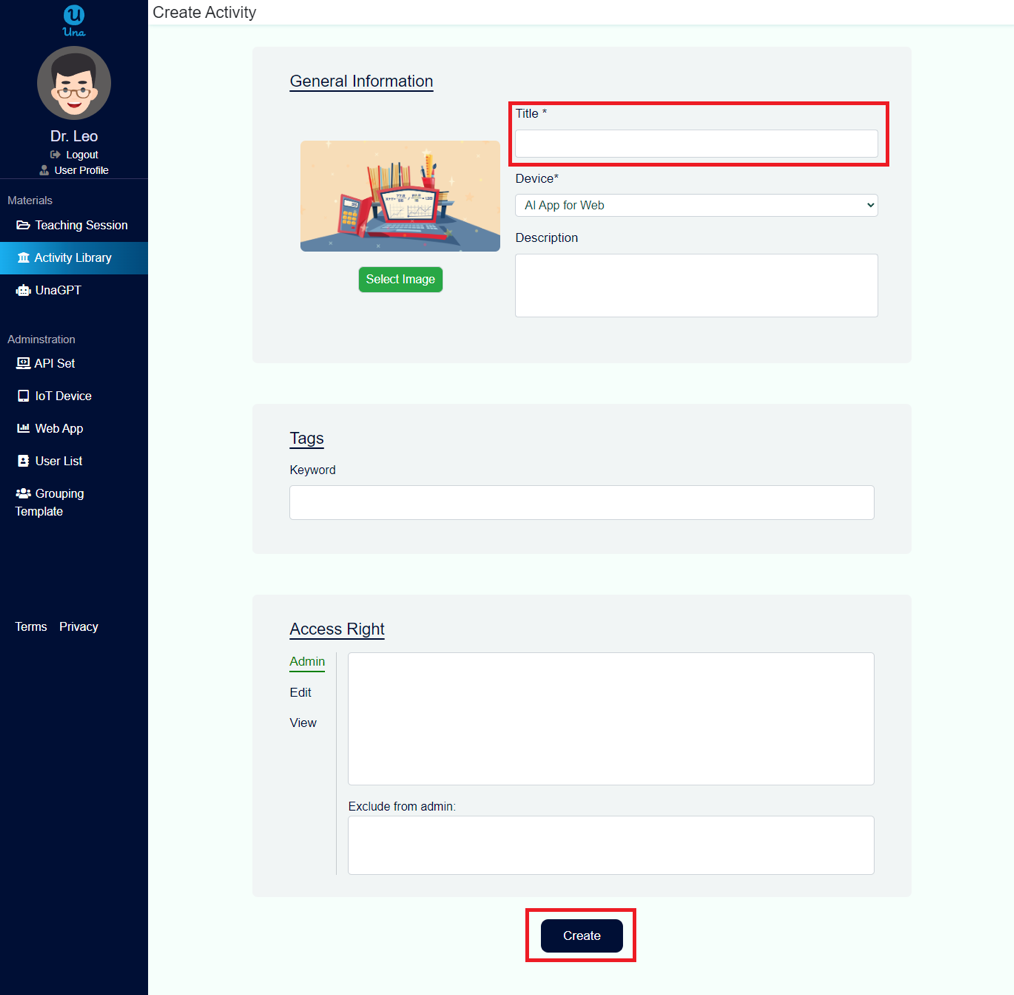
- Fill in the activity title, then click “Create”. You may also input other details.
- A dialog will pop up after clicking “Create”, please choose “Yes”, you will be redirected to create tasks and questions.
3. Fill in activity content – Task general info
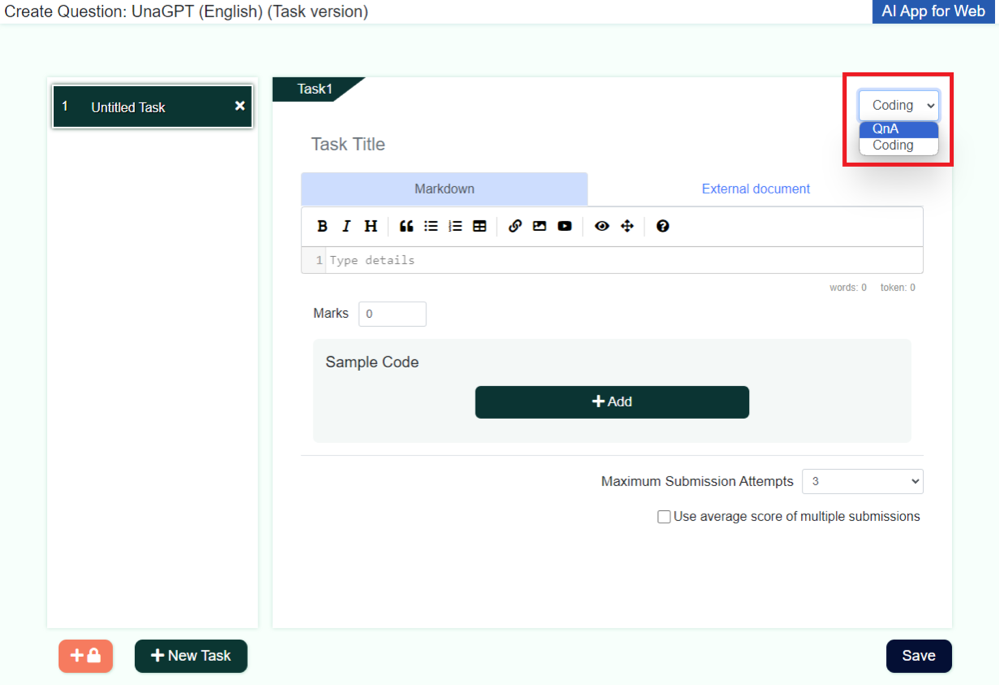
- On the top right corner of activity content, change the task type to “QnA”.
- Fill in Task Title.
- Fill in Task details by inserting text or any other content.
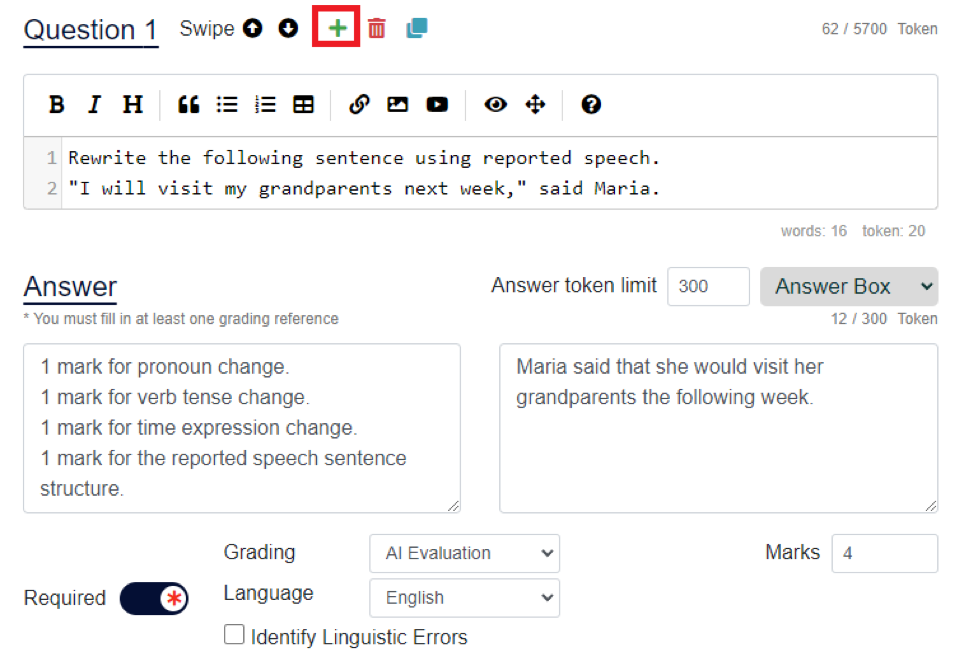
4. Fill in activity content – Task questions
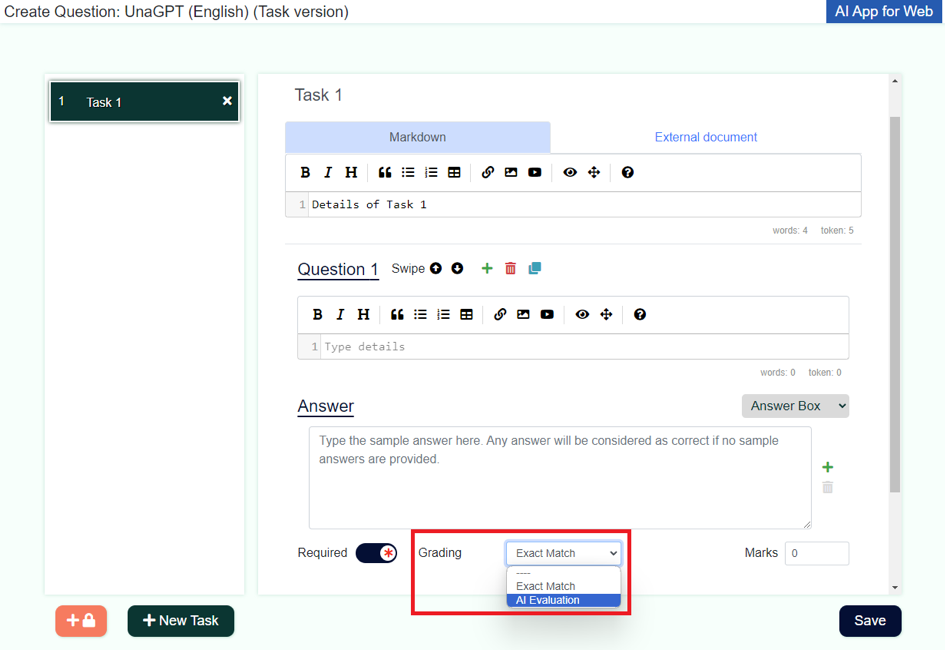
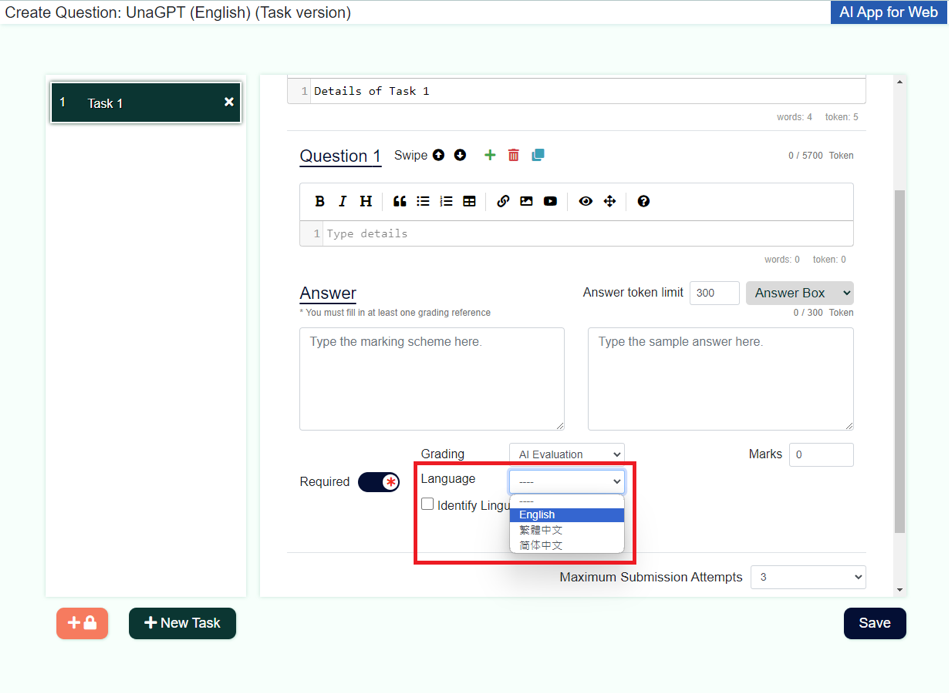
- Change the question Grading to “AI Evaluation”.
- Choose the Language of AI evaluation and feedback.
- Type the question, marks (minimum value: 1) and grading reference. Remarks: you are required to fill at least one marking scheme or sample answer.
- Click + button to add new questions and repeat steps 1 – 3.
5. Adjust submission options
-
The bottom part of each task is the task submission option, you can change the default setting.
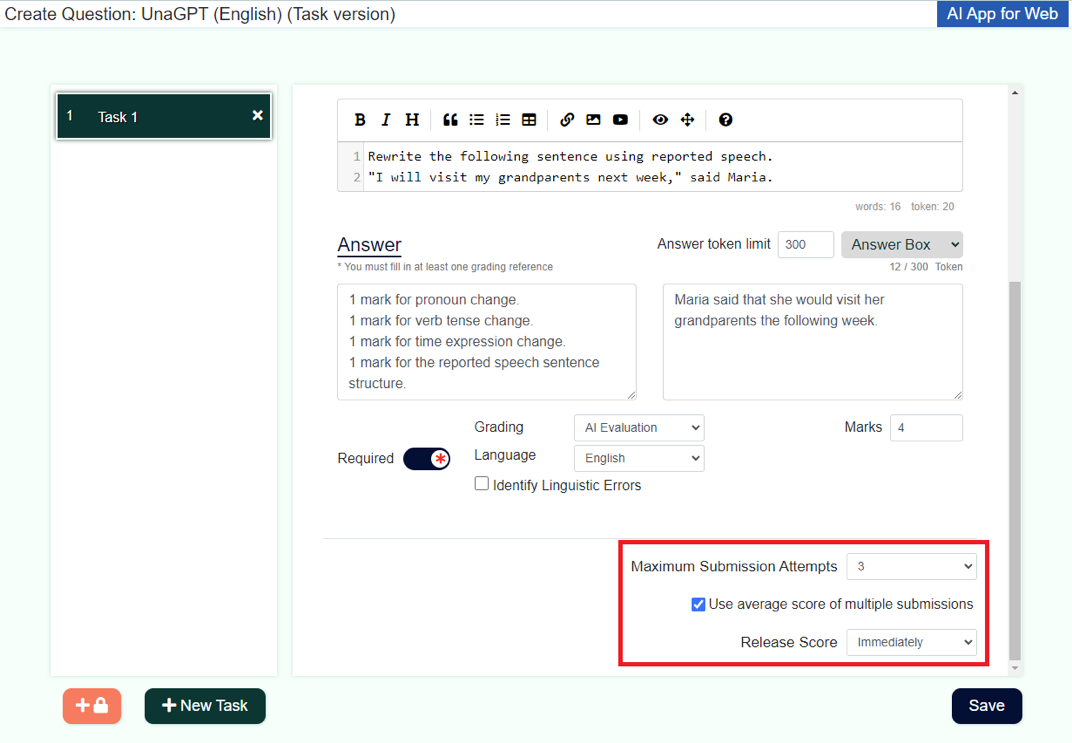
- Maximum Submission Attempts: maximum number of submission, range: 1 – 3.
Use average score of multiple submissions: calculate student’s final score using average scores from each attempt (score might not be deducted if same answer is submitted for multiple time). For example, 1st submission: 2 marks, 2nd submission: 4 marks => (2+4)/2 = 3 marks. If this function is not enabled, the latest submission score will be used for the student’s final score.
Release Score:
- Immediately: AI feedback will be released right after student submitted a task
- After Review: AI feedback will be released after teacher reviewed (Only applicable to task with AI evaluation question)
6. Complete creating activity content
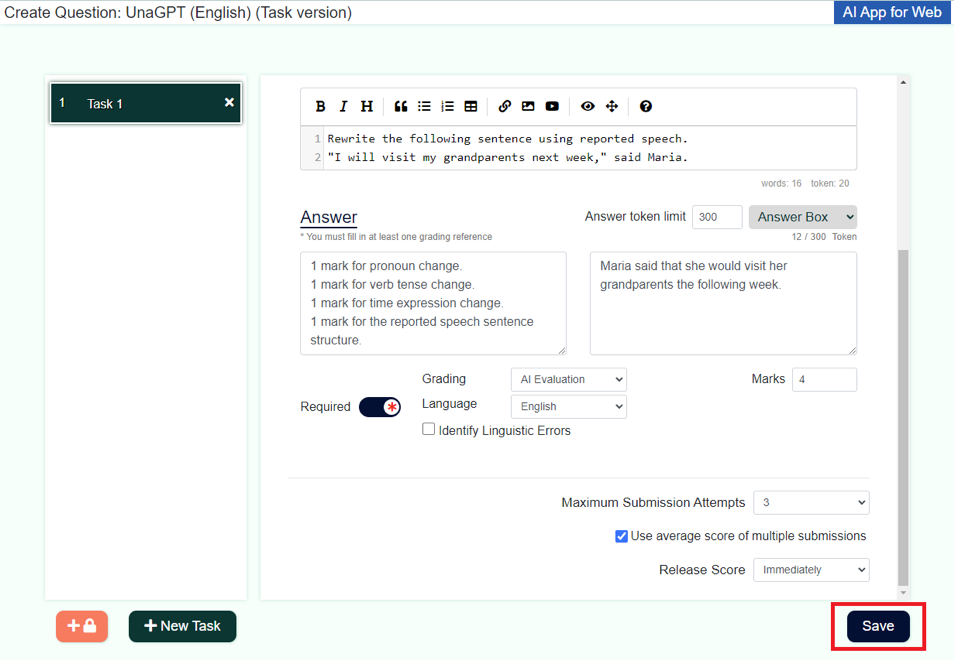
- To add more chapters in the activity, click “New Task” button on the left bottom corner, then repeat the steps above.
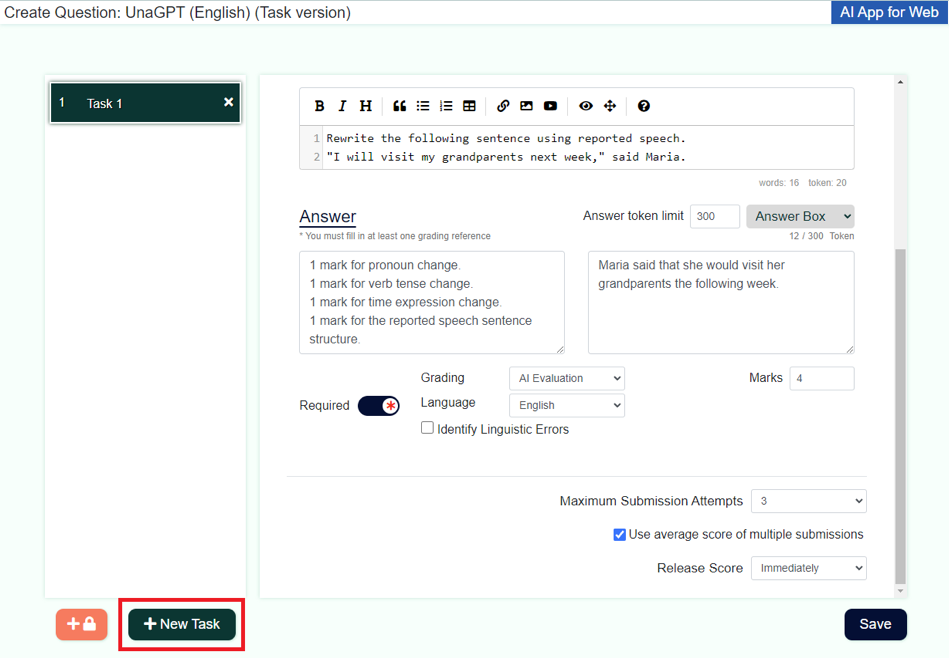
- After adding all tasks, click “Save” on bottom right corner to save the created activity content.
7. Create a virtual classroom
- Click “Teaching Session” on the left menu, then click “Create Session” on the top right corner.
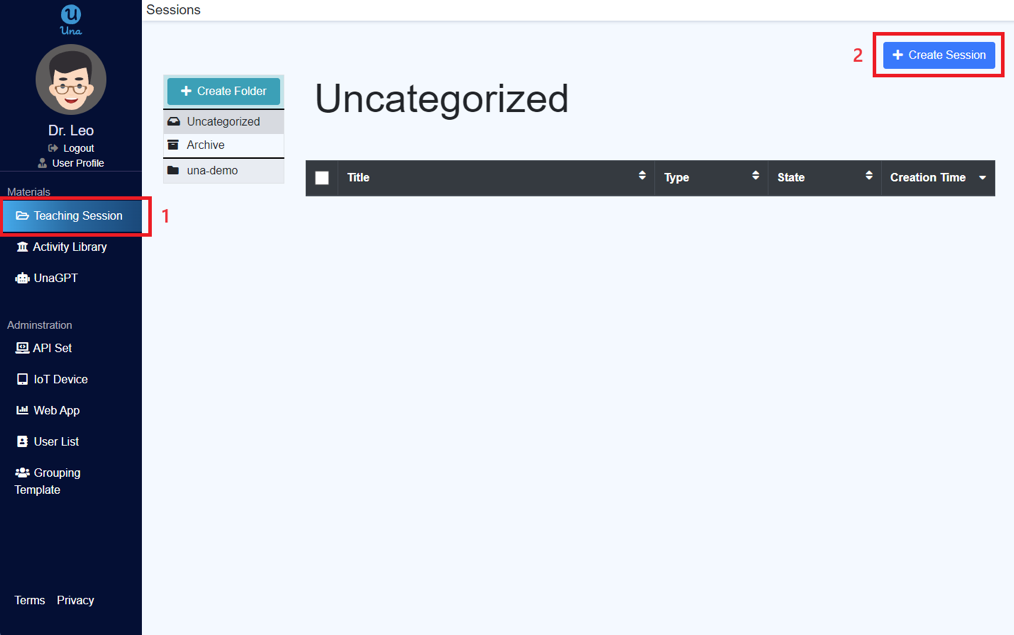
- Fill in Title.
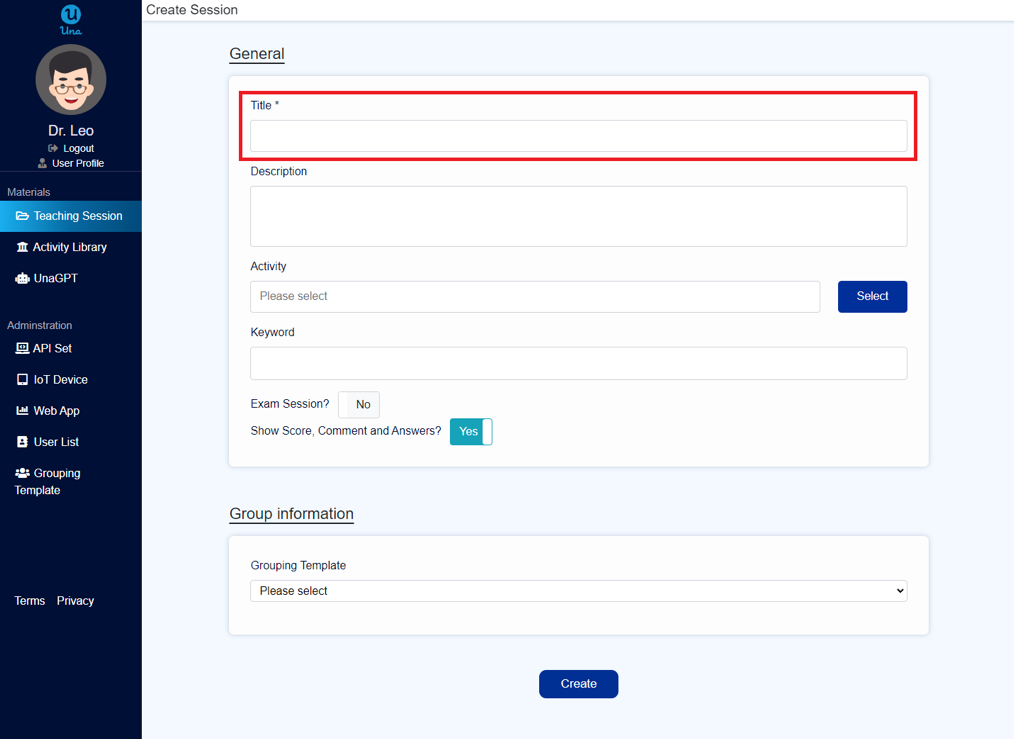
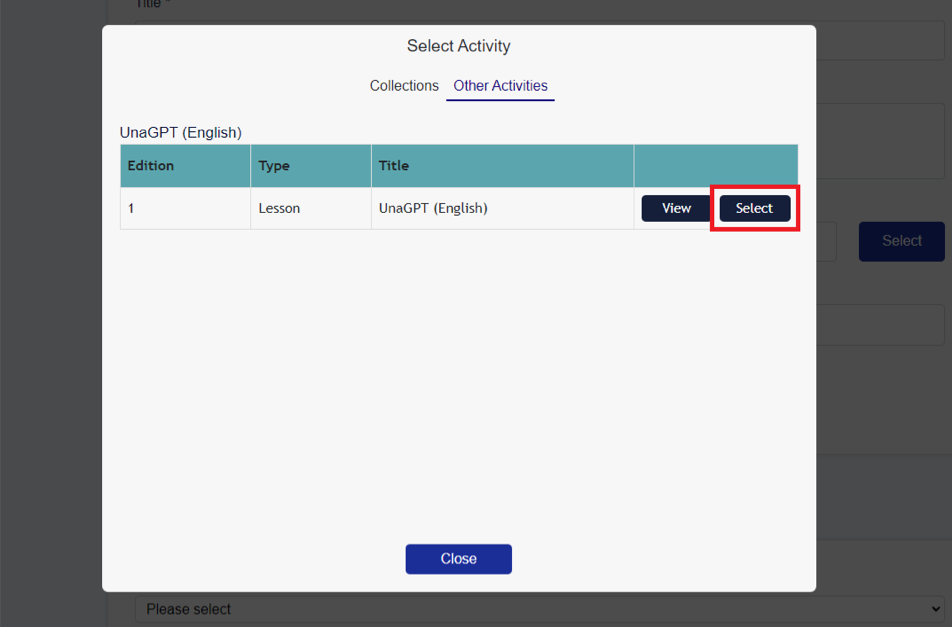
- Click the “Select” button on the right of the Activity field, then select the AI activity created in the dialog.
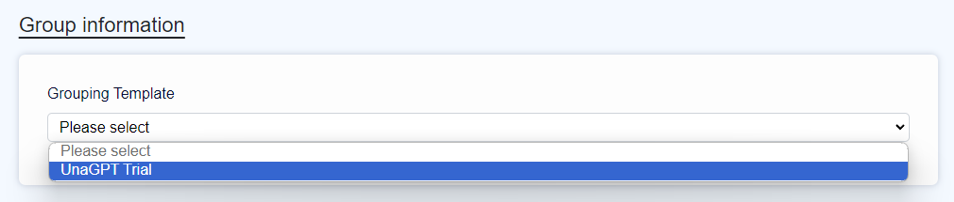
- Choose “UnaGPT Trial” grouping template.
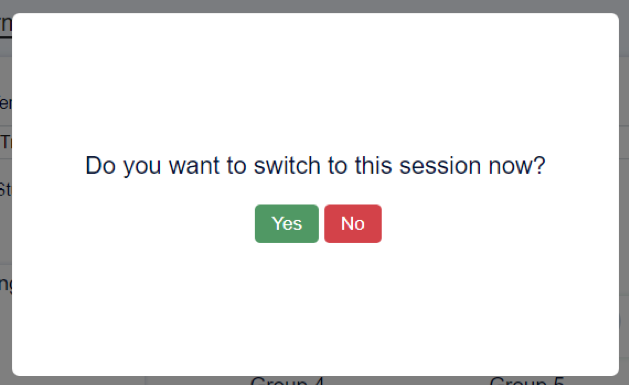
- Click “Create”, then choose “Yes” to start a lesson.
8. Start Lesson
- After switching to the session, click “Assemble” to invite students to join the lesson.
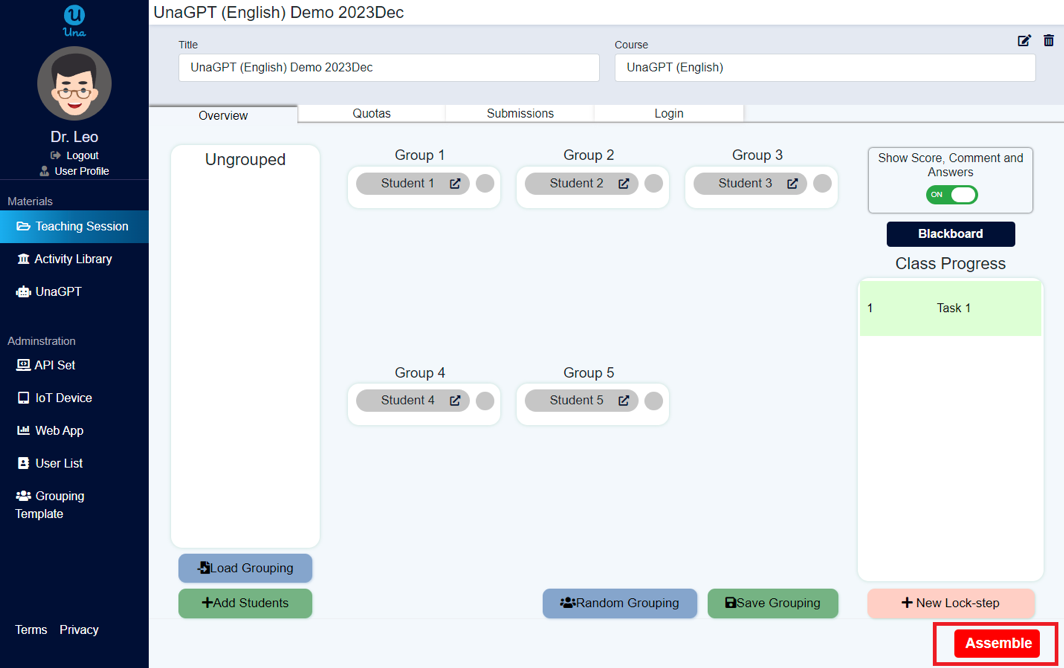
- After the button changes to “Start”, click again to start the lesson. The students in the “Random Grouping” can now enter this virtual classroom to answer questions.

9. Adjust virtual classroom options
-
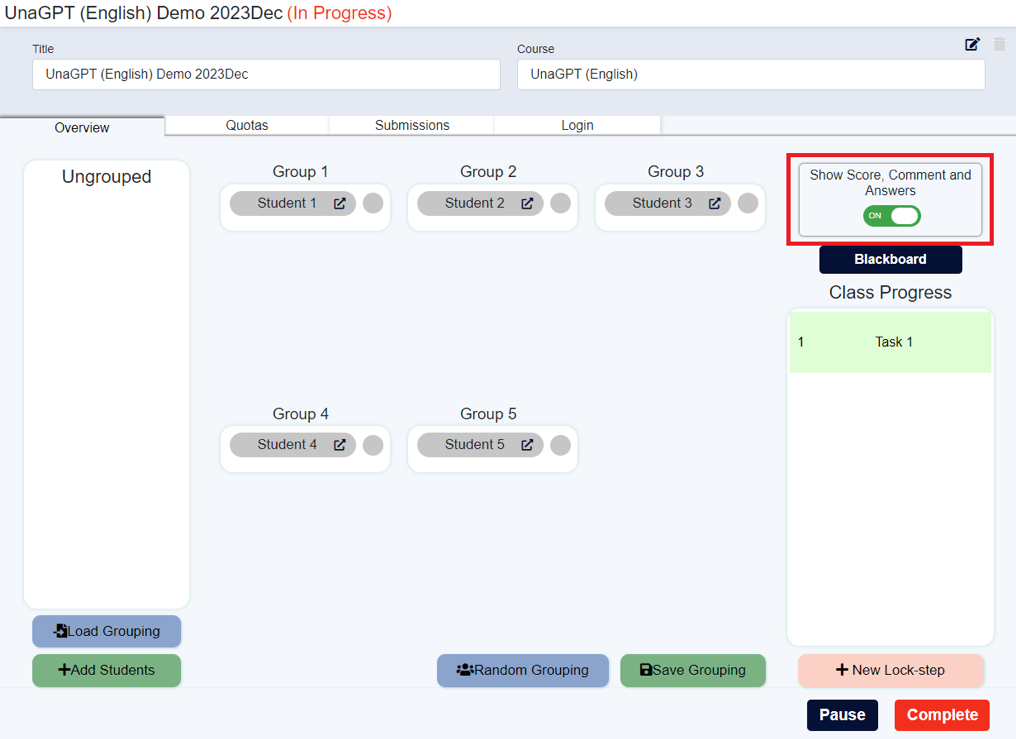
Enable “Show Score, Comment and Answer” on the right to allow student to check their score and comments.
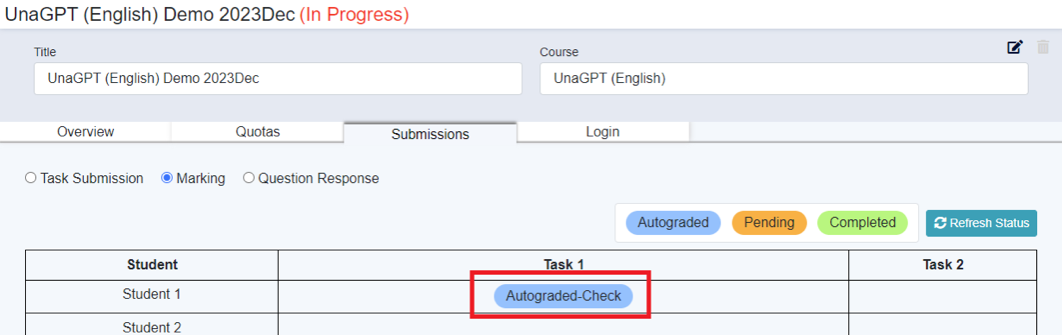
10. Monitor the submission status of students
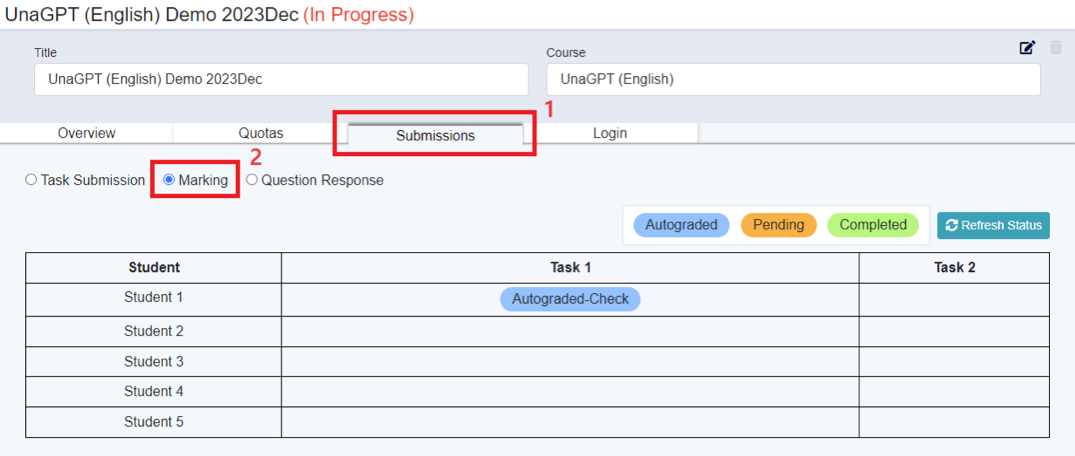
- In a session, click “Submissions”, then choose “Marking”.
-
You can check the marking status of each task. There are total three statuses:
- Autograded: AI feedback has been released to the student, while teacher can still alter the released content.
- Pending: Teacher is required to review AI-generated feedback; or to handle an appeal by the student.
- Completed: Teacher has 1) reviewed AI feedback or 2) handled an appeal and released the altered content to the student.
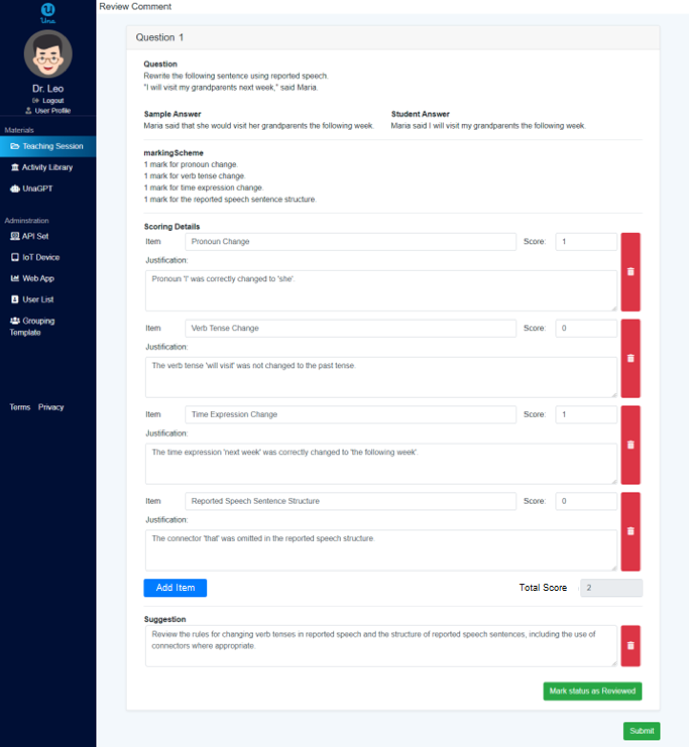
11. Review AI generated grades and feedback
-
Except for the “Completed” task, you can click the statuses of “Autograded” and “Pending” to check or review AI feedback.
- Then, you may alter the score and comments. After finishing one question, you can click “Mark status as Reviewed”.
- At last, click “Save” to update the feedback. Once the update is saved, the student cannot re-submit the task.