-
Student
-
Teacher
-
Auto-marking
-
Coding
-
-
- Generate a Option List
- Deselecting All Options
- Choosing All Options
- Deselect Some Options
- Select Some Options
- Getting Options that are Selected
- Changing the Option List Size
- Drop Down List With Multiple Selections
- Checking Option List is Multiple or Not
- Setting Multiple Choices in Option List
- Getting All Options
-
-
- Changing Margins
- Creating Space Around the Variable in Different Side
- Border Radius Width
- Changing Minimum Height
- Changing the Height of Variable or Layout
- Changing Maximum Width
- Changing Minimum Width
- Changing the Width of Variable or Layout
- Self Alignment Property
- Fitting the Space Available in Flex Container
- Flex Shorthand Property
- Changing Maximum Height
-
-
-
-
-
-
-
- Adding Two Values
- Subtracting two numbers
- Multiplying two numbers
- Dividing two numbers
- Setting a Number
- Showing Remainder Between Two Numbers
- Finding the Minimum Values
- Finding the Maximum Values
- Changing the Number to Absolute Value
- Taking the Square Root
- Converting the Number to an Approximate Value
- Choosing the Random Value
-
-
-
- Breaking Text with Separators
- Checking Whether the Text Contains Characters
- Finding the Position of the Character
- Checking Text is Empty or Not
- Showing Text in Substring Format
- Showing the Order of Characters in Two Texts
- Displaying Character at the Certain Position
- Using Character Code to Show Text
-
-
- Converting Text to DateTimeOffset Format
- Generate a DateTimeOffset with Different Unit
- Generate DateTimeOffset Using Unix Time
- Using the Current Time to Display DateTimeOffset
- Combining a New Offset with DateTimeOffset
- Modifying Offset
- Changing the Format of DateTimeOffset to Text Format
- Converting DateTimeOffset to Text Format
- Adding DateTimeOffset with Duration
- Calculating the Duration Between Two DateTimeOffsets
- Checking Whether DateTimeOffsets are the Same
- Showing DateTimeOffset in Milliseconds
- Showing DateTimeOffset in Different Time Format
- Checking Whether DateTimeOffset is in Correct Type
-
- Converting Text to Duration
- Transforming Number to Duration
- Converting String to Duration
- Making Opposite Duration
- Adding Two Durations
- Changing the Duration Unit
- Checking Whether Two Durations are the Same
- Displaying Total Number of Duration in Different Units
- Showing Duration in Number Format with Unit
- Checking Whether Duration is in Correct Data Type
-
-
Coding - Pi
-
-
-
-
- Adding Two Values
- Subtracting two numbers
- Multiplying two numbers
- Dividing two numbers
- Setting a Number
- Showing Remainder Between Two Numbers
- Finding the Minimum Values
- Finding the Maximum Values
- Taking the Square Root
- Converting the Number to an Approximate Value
- Changing the Number to Absolute Value
- Choosing the Random Value
-
-
- Transforming Text to Number
- Concatenating the Text
- Checking the Length of Text
- Setting Text
- Breaking Text with Separators
- Checking Whether the Text Contains Characters
- Finding the Position of the Character
- Checking Text is Empty or Not
- Showing Text in Substring Format
- Showing the Order of Characters in Two Texts
- Displaying Character at the Certain Position
- Using Character Code to Show Text
-
-
-
- Converting Text to DateTimeOffset Format
- Generate a DateTimeOffset with Different Unit
- Generate DateTimeOffset Using Unix Time
- Using the Current Time to Display DateTimeOffset
- Combining a New Offset with DateTimeOffset
- Modifying Offset
- Changing the Format of DateTimeOffset to Text Format
- Converting DateTimeOffset to Text Format
- Calculating the Duration Between Two DateTimeOffsets
- Adding DateTimeOffset with Duration
- Checking Whether DateTimeOffsets are the Same
- Showing DateTimeOffset in Milliseconds
- Showing DateTimeOffset in Different Time Format
- Checking Whether DateTimeOffset is in Correct Type
-
- Converting Text to Duration
- Transforming Number to Duration
- Converting String to Duration
- Making Opposite Duration
- Adding Two Durations
- Changing the Duration Unit
- Checking Whether Two Durations are the Same
- Displaying Total Number of Duration in Different Units
- Showing Duration in Number Format with Unit
- Checking Whether Duration is in Correct Data Type
-
-
-
- Loading Custom Pose Model from URL
- Classifying Pose on Image
- Classifying Pose on Image and Get All Result
- Showing the Class Labels in Pose Model
- Showing the Total Amount of Classes with Pose Model
- Draw All Skeleton and the Key Points
- Draw All Skeleton Inside a Photo
- Draw All Key Points Inside a Photo
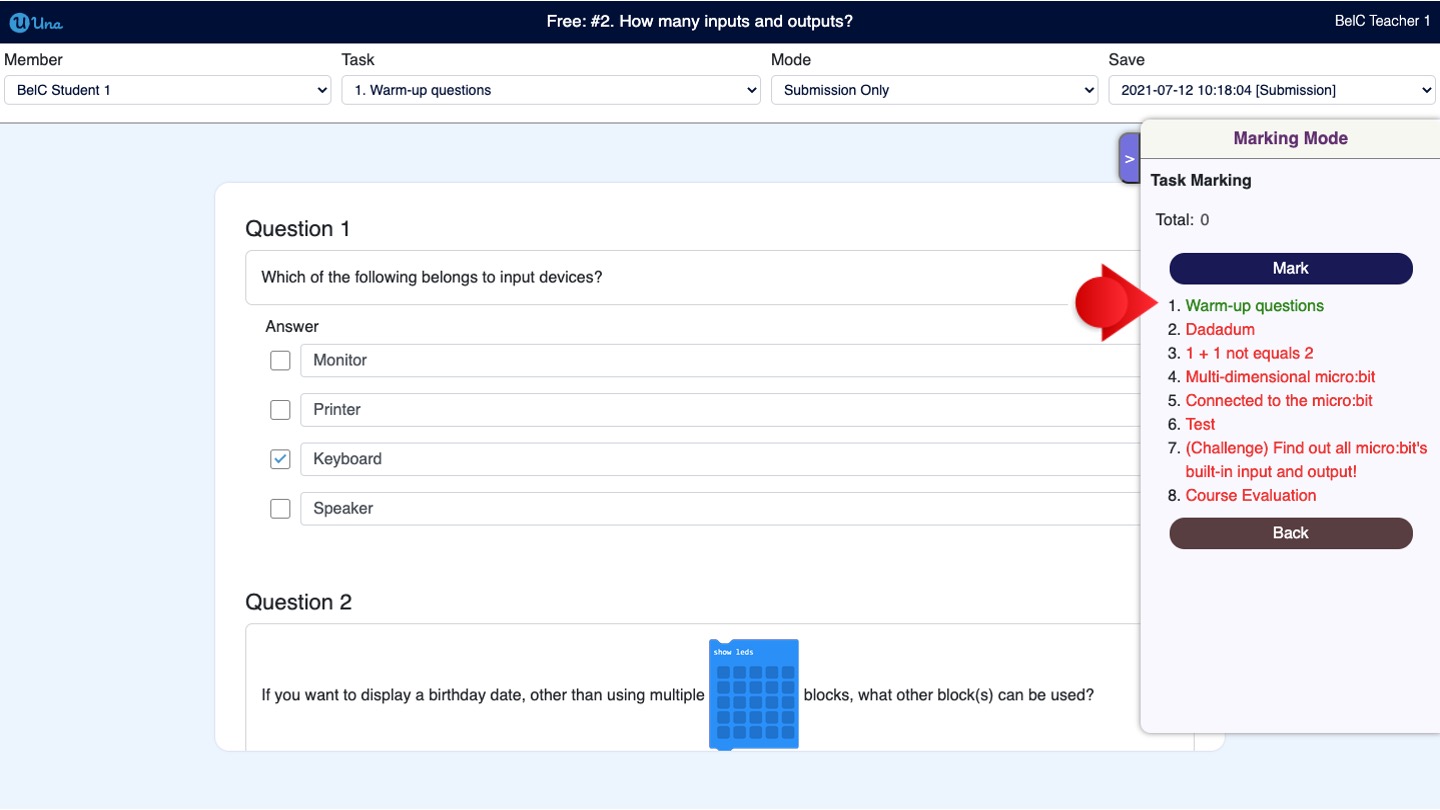
Marking
How to mark the task?
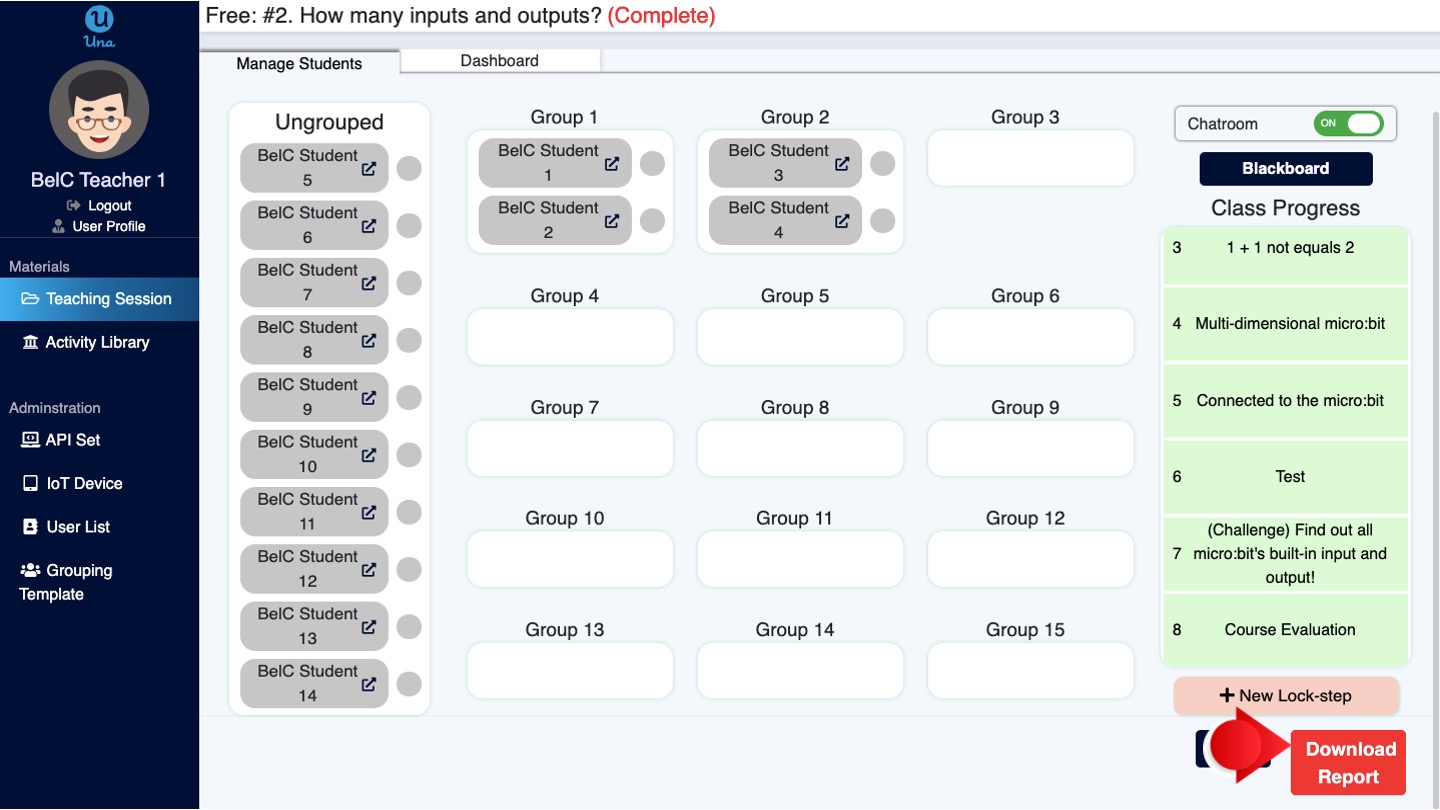
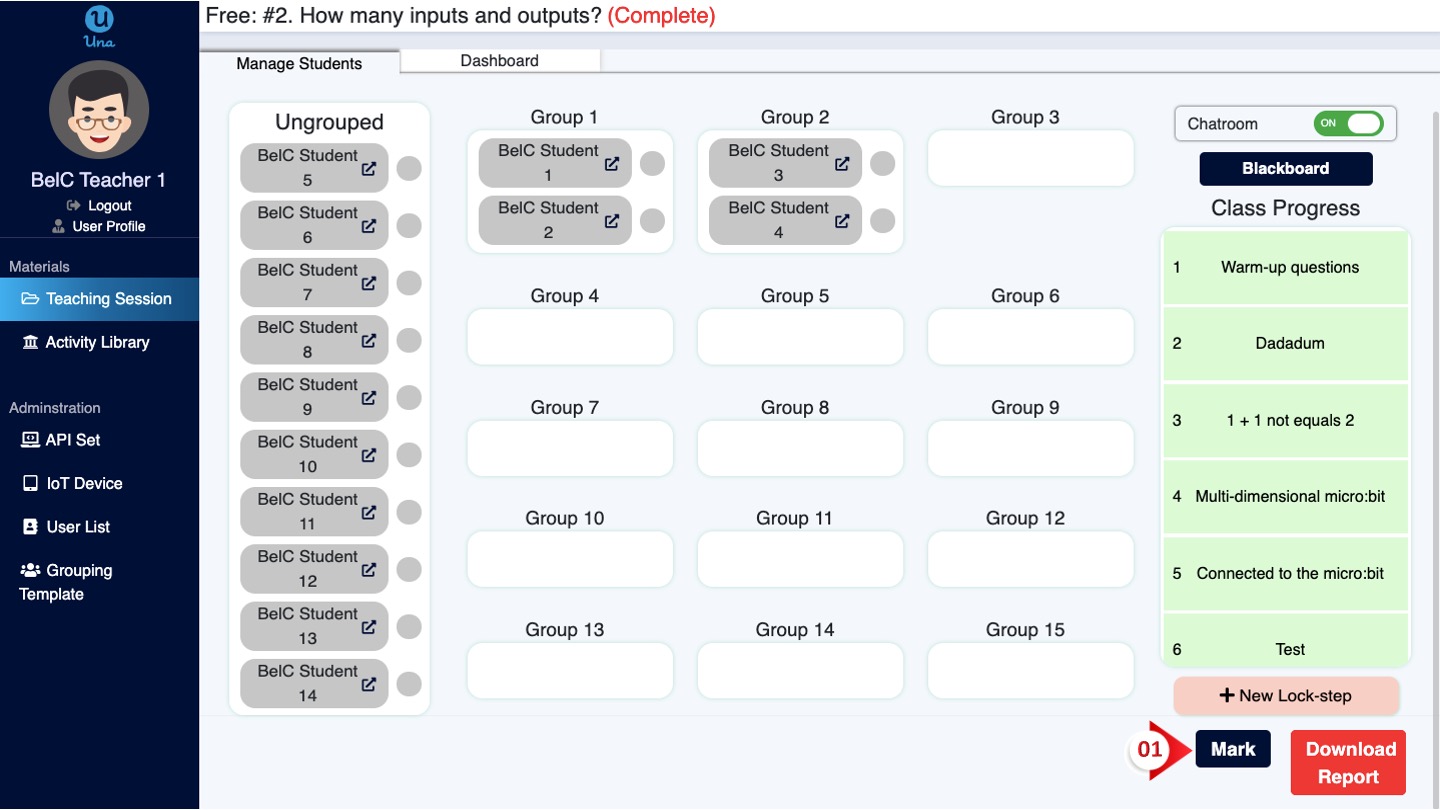
When a virtual classroom is in the status of “Completion”, teachers can mark students’ tasks and download reports as a reference. Mark the task by following the steps below.
1.Choose the virtual classroom that is in the “Complete” state, click the “Mark” button on the right-hand side
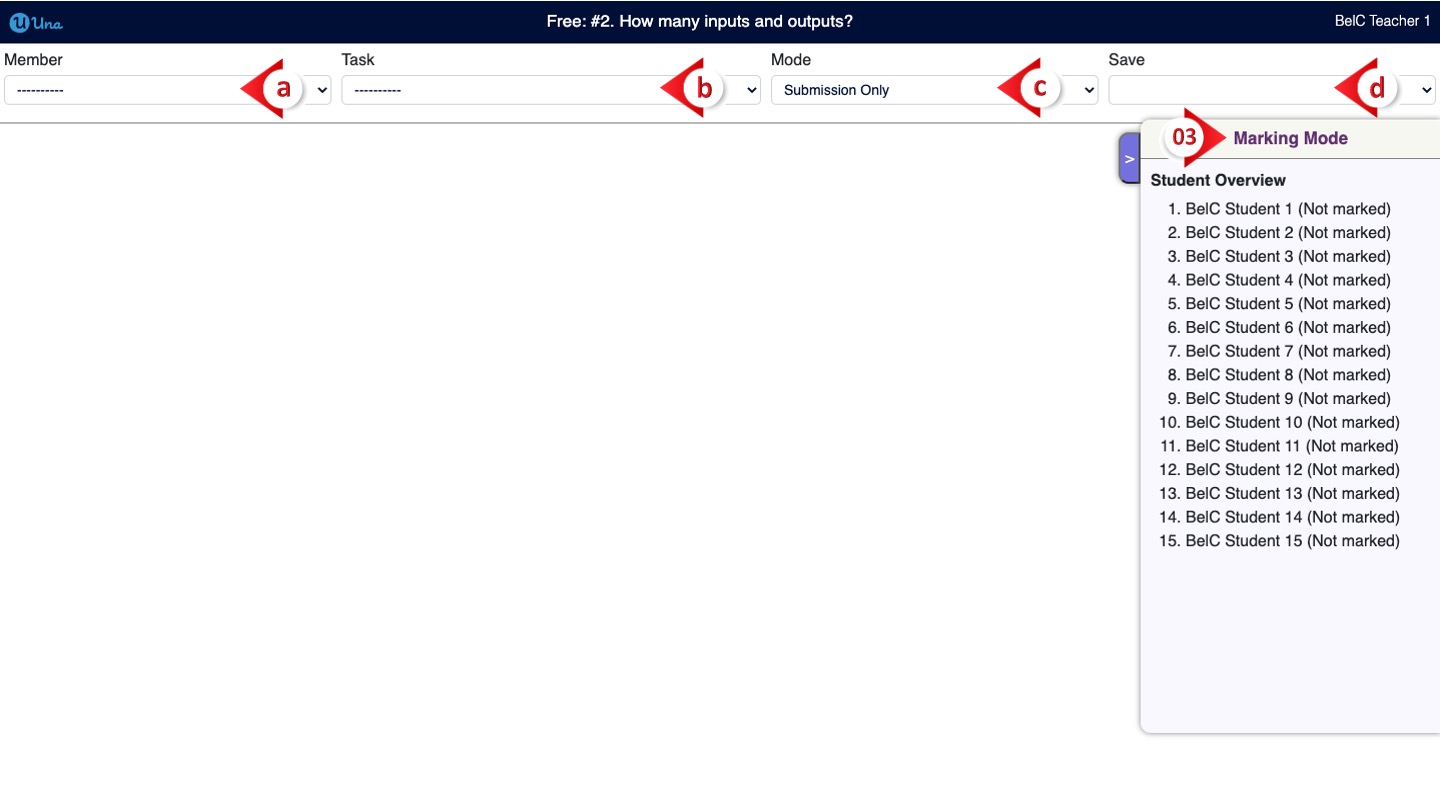
2. Pick the lesson details from the drop-down menu:
a. Member: Select a student
b. Task: Select a task
c. Mode: Select to show “Submission only” or “All”
d. Save: Select the saving version
3. Check the Marking Mode from the right-hand side (If that task has a marking setting)
Editing the user list
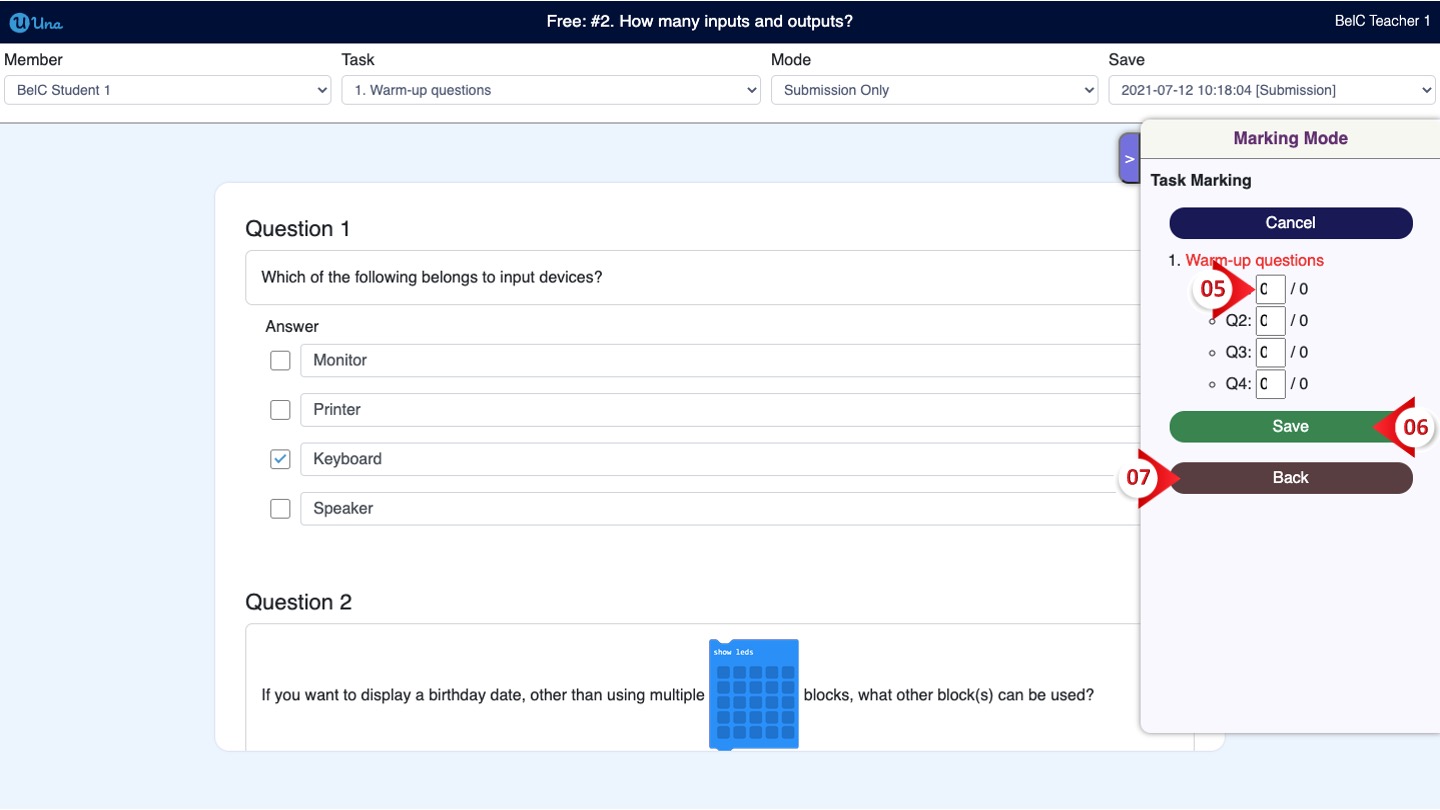
4. After choosing all the details, click “Mark”
5. Click the button beside the mark number to adjust Marks. (Only for questions that set with marks beforehand)
6. Click “Save” upon finishing all the steps
7. If you finished marking all the tasks, click “Back” to mark the next student
When you successfully marked a task, you can see the title of the task become green in colour and stated as “(marked)”. Those tasks that are not marked will be shown in red font.
Notice: Require time for the system to update

Download Report
After finishing marking, go back to the virtual classroom. Click the “Download Report” button. You will get an excel file with all the marked students and the scores of tasks in order to review students’ performance.