-
Student
-
Teacher
-
Auto-marking
-
Coding
-
-
- Generate a Option List
- Deselecting All Options
- Choosing All Options
- Deselect Some Options
- Select Some Options
- Getting Options that are Selected
- Changing the Option List Size
- Drop Down List With Multiple Selections
- Checking Option List is Multiple or Not
- Setting Multiple Choices in Option List
- Getting All Options
-
-
- Changing Margins
- Creating Space Around the Variable in Different Side
- Border Radius Width
- Changing Minimum Height
- Changing the Height of Variable or Layout
- Changing Maximum Width
- Changing Minimum Width
- Changing the Width of Variable or Layout
- Self Alignment Property
- Fitting the Space Available in Flex Container
- Flex Shorthand Property
- Changing Maximum Height
-
-
-
-
-
-
-
- Adding Two Values
- Subtracting two numbers
- Multiplying two numbers
- Dividing two numbers
- Setting a Number
- Showing Remainder Between Two Numbers
- Finding the Minimum Values
- Finding the Maximum Values
- Changing the Number to Absolute Value
- Taking the Square Root
- Converting the Number to an Approximate Value
- Choosing the Random Value
-
-
-
- Breaking Text with Separators
- Checking Whether the Text Contains Characters
- Finding the Position of the Character
- Checking Text is Empty or Not
- Showing Text in Substring Format
- Showing the Order of Characters in Two Texts
- Displaying Character at the Certain Position
- Using Character Code to Show Text
-
-
- Converting Text to DateTimeOffset Format
- Generate a DateTimeOffset with Different Unit
- Generate DateTimeOffset Using Unix Time
- Using the Current Time to Display DateTimeOffset
- Combining a New Offset with DateTimeOffset
- Modifying Offset
- Changing the Format of DateTimeOffset to Text Format
- Converting DateTimeOffset to Text Format
- Adding DateTimeOffset with Duration
- Calculating the Duration Between Two DateTimeOffsets
- Checking Whether DateTimeOffsets are the Same
- Showing DateTimeOffset in Milliseconds
- Showing DateTimeOffset in Different Time Format
- Checking Whether DateTimeOffset is in Correct Type
-
- Converting Text to Duration
- Transforming Number to Duration
- Converting String to Duration
- Making Opposite Duration
- Adding Two Durations
- Changing the Duration Unit
- Checking Whether Two Durations are the Same
- Displaying Total Number of Duration in Different Units
- Showing Duration in Number Format with Unit
- Checking Whether Duration is in Correct Data Type
-
-
Coding - Pi
-
-
-
-
- Adding Two Values
- Subtracting two numbers
- Multiplying two numbers
- Dividing two numbers
- Setting a Number
- Showing Remainder Between Two Numbers
- Finding the Minimum Values
- Finding the Maximum Values
- Taking the Square Root
- Converting the Number to an Approximate Value
- Changing the Number to Absolute Value
- Choosing the Random Value
-
-
- Transforming Text to Number
- Concatenating the Text
- Checking the Length of Text
- Setting Text
- Breaking Text with Separators
- Checking Whether the Text Contains Characters
- Finding the Position of the Character
- Checking Text is Empty or Not
- Showing Text in Substring Format
- Showing the Order of Characters in Two Texts
- Displaying Character at the Certain Position
- Using Character Code to Show Text
-
-
-
- Converting Text to DateTimeOffset Format
- Generate a DateTimeOffset with Different Unit
- Generate DateTimeOffset Using Unix Time
- Using the Current Time to Display DateTimeOffset
- Combining a New Offset with DateTimeOffset
- Modifying Offset
- Changing the Format of DateTimeOffset to Text Format
- Converting DateTimeOffset to Text Format
- Calculating the Duration Between Two DateTimeOffsets
- Adding DateTimeOffset with Duration
- Checking Whether DateTimeOffsets are the Same
- Showing DateTimeOffset in Milliseconds
- Showing DateTimeOffset in Different Time Format
- Checking Whether DateTimeOffset is in Correct Type
-
- Converting Text to Duration
- Transforming Number to Duration
- Converting String to Duration
- Making Opposite Duration
- Adding Two Durations
- Changing the Duration Unit
- Checking Whether Two Durations are the Same
- Displaying Total Number of Duration in Different Units
- Showing Duration in Number Format with Unit
- Checking Whether Duration is in Correct Data Type
-
-
-
- Loading Custom Pose Model from URL
- Classifying Pose on Image
- Classifying Pose on Image and Get All Result
- Showing the Class Labels in Pose Model
- Showing the Total Amount of Classes with Pose Model
- Draw All Skeleton and the Key Points
- Draw All Skeleton Inside a Photo
- Draw All Key Points Inside a Photo
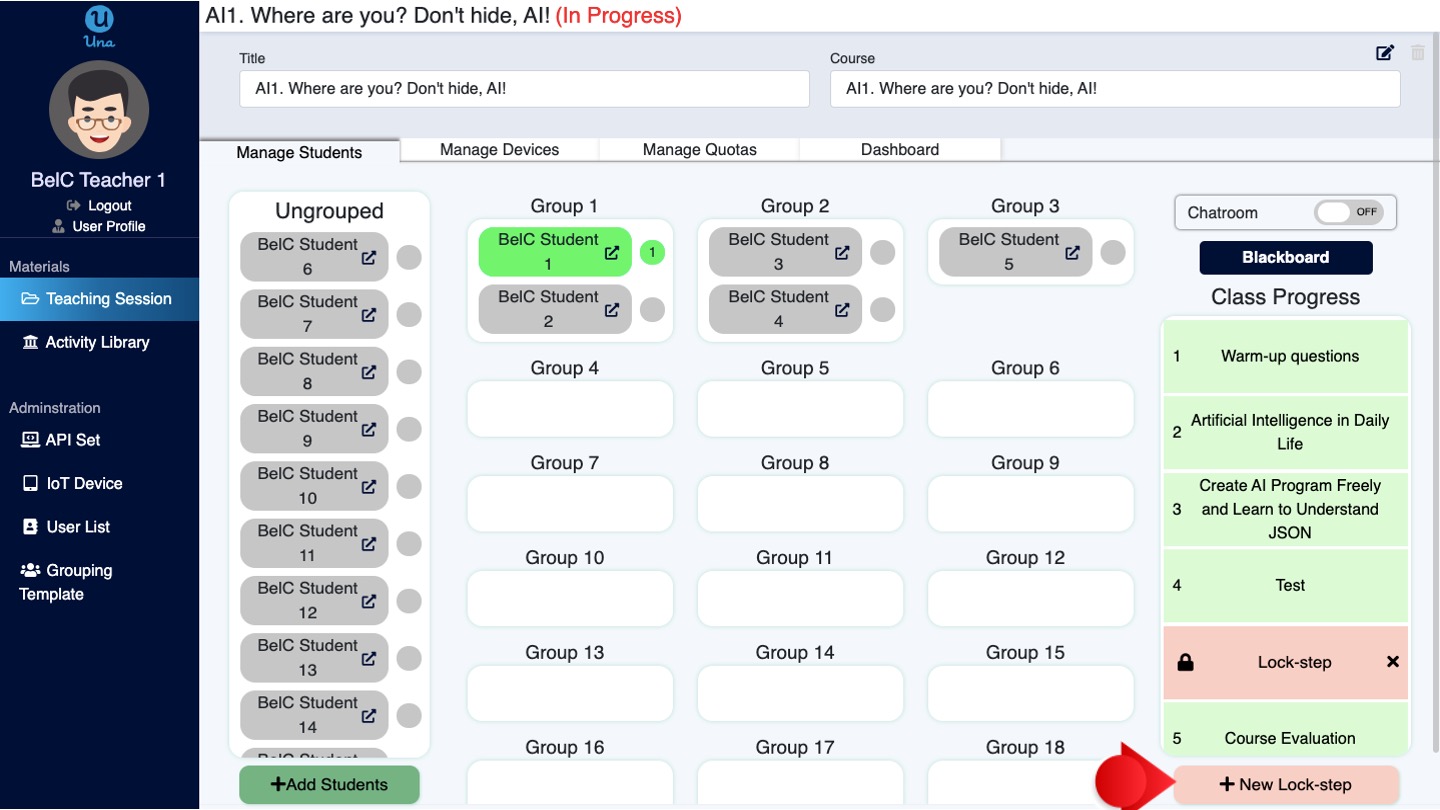
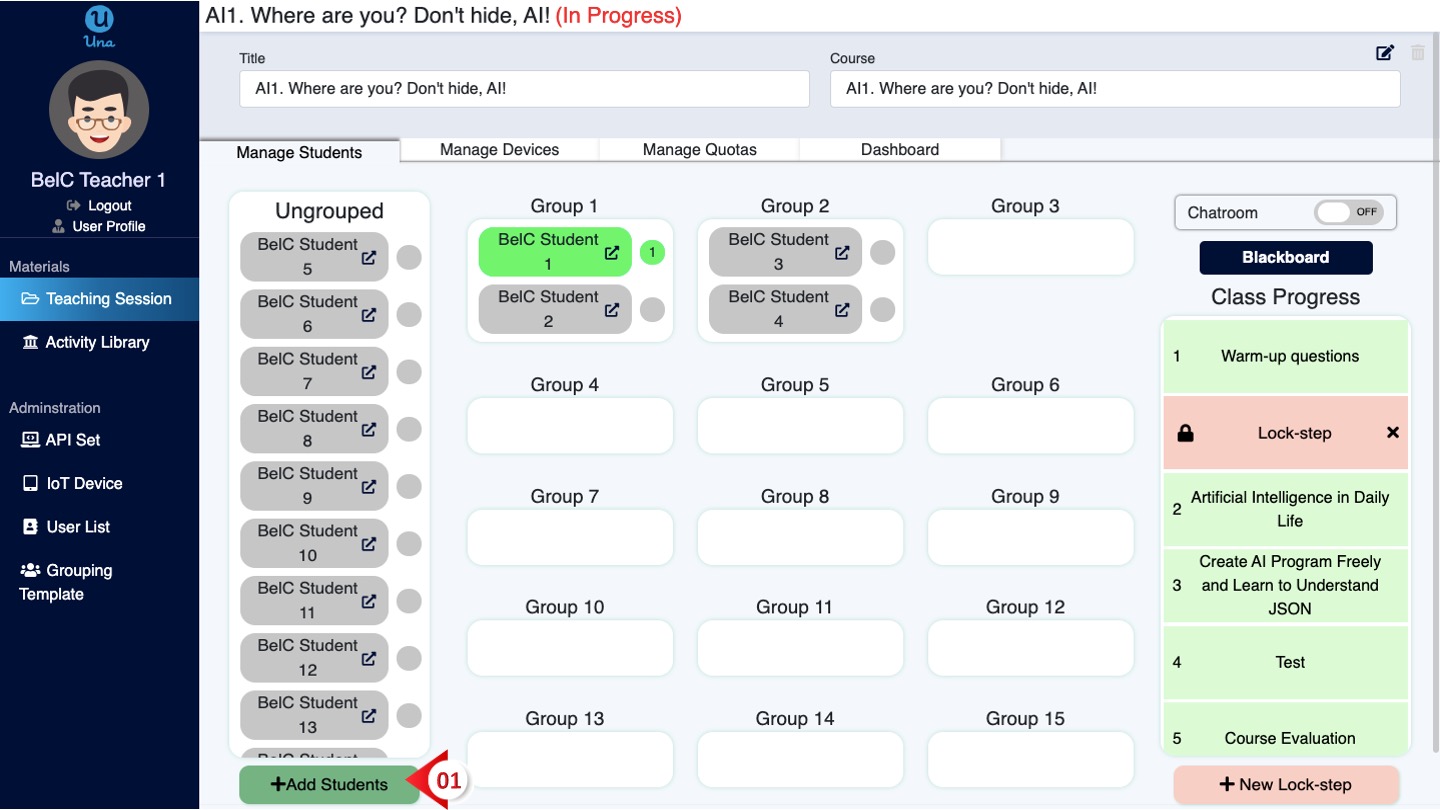
Manage Students
In this interface, teachers can view the online status of students, adjust student groups, add students, chatrooms, blackboards, and Lock-step. You can view the progress of students in real–time through the Una platform, check whether they can keep up with the progress, and adjust the pace of teaching as soon as possible.
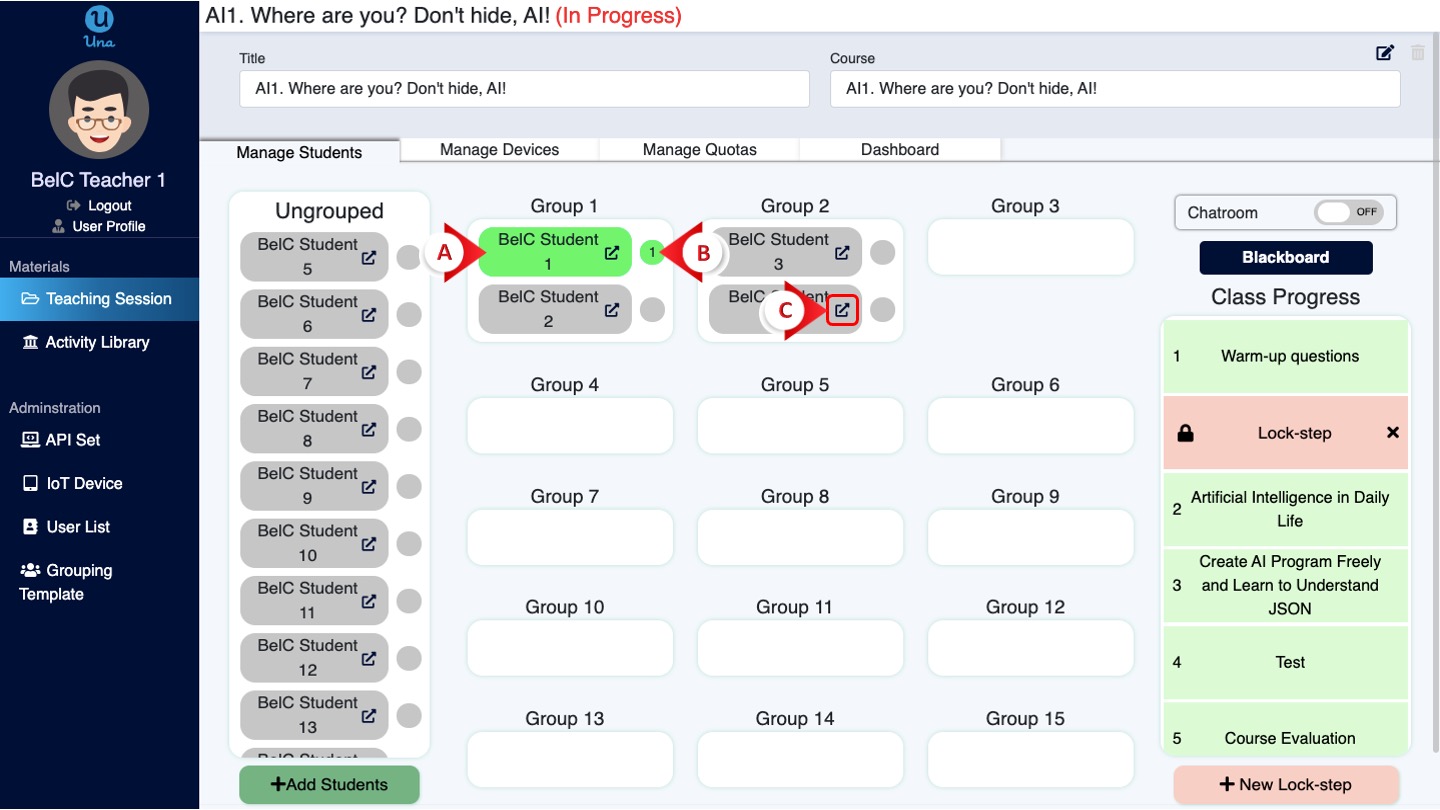
Online Status
A. View the online status of students
If a student has entered the classroom, the student’s label will turn green. If the label is gray, the student is offline.
B. View the progress of students in real-time
The number shown in the circle next to the student’s name represents which task the student is doing. For example, the number is displayed as 1, which means that the student is in task 1.
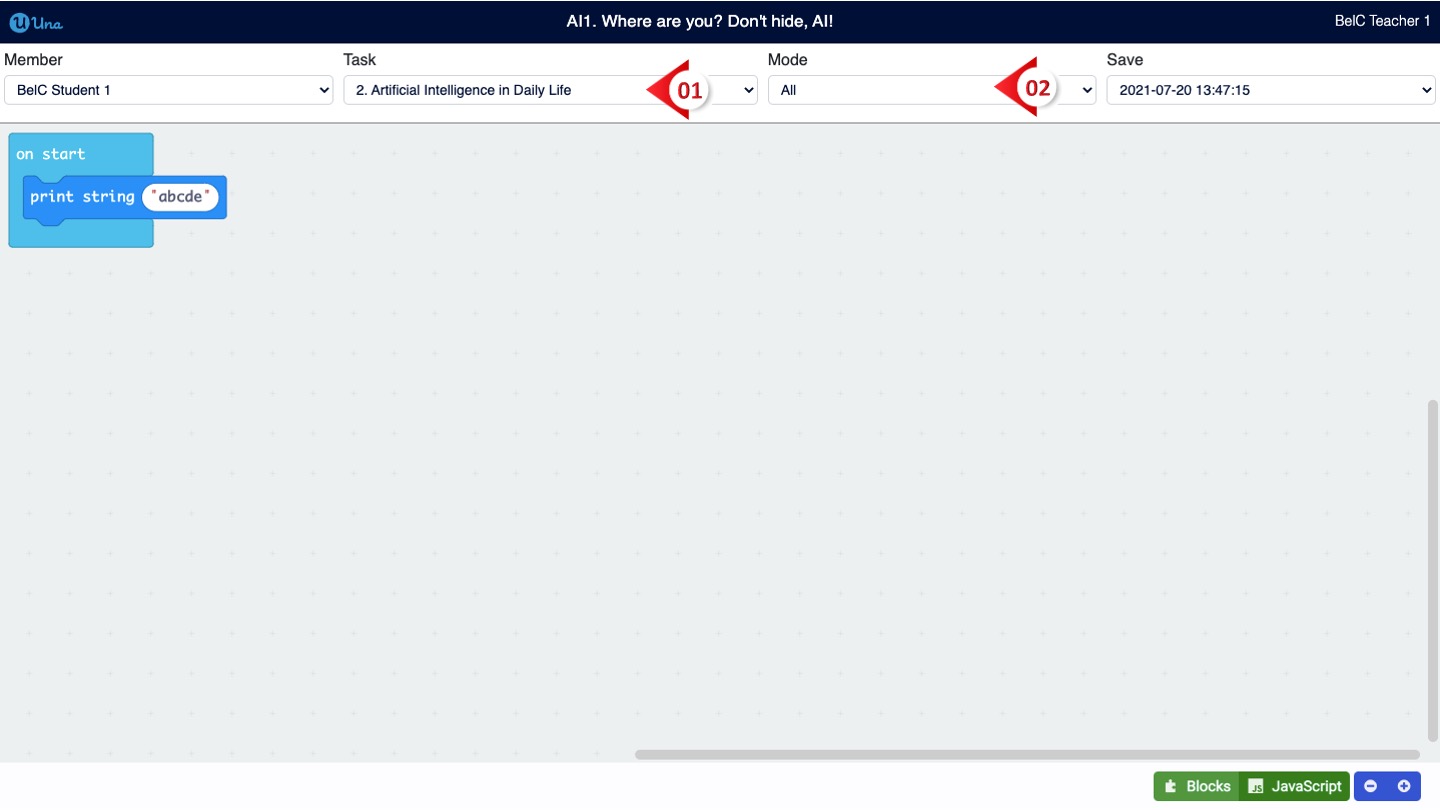
C. You can click the button next to the student’s name to check the student’s history in real-time, including the auto-saving and submitting records.
- Click the “task” menu to choose the task you want to check
- Click the “Mode” menu
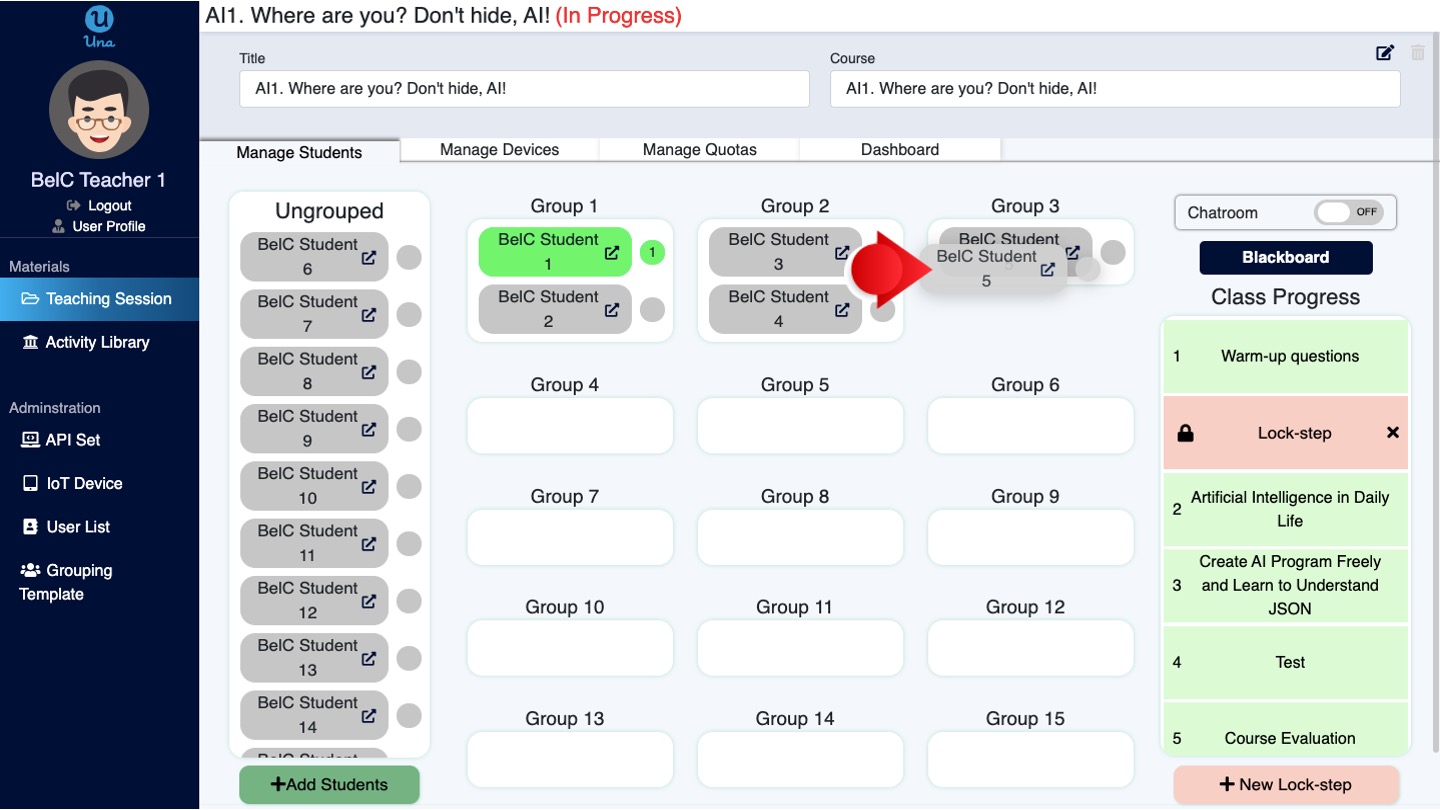
Adjust Student Grouping
Teachers can still change the grouping on this page. You can drag students to redistribute student groups.
Notice: Students must be assigned to one of the groups before they can participate in the class.
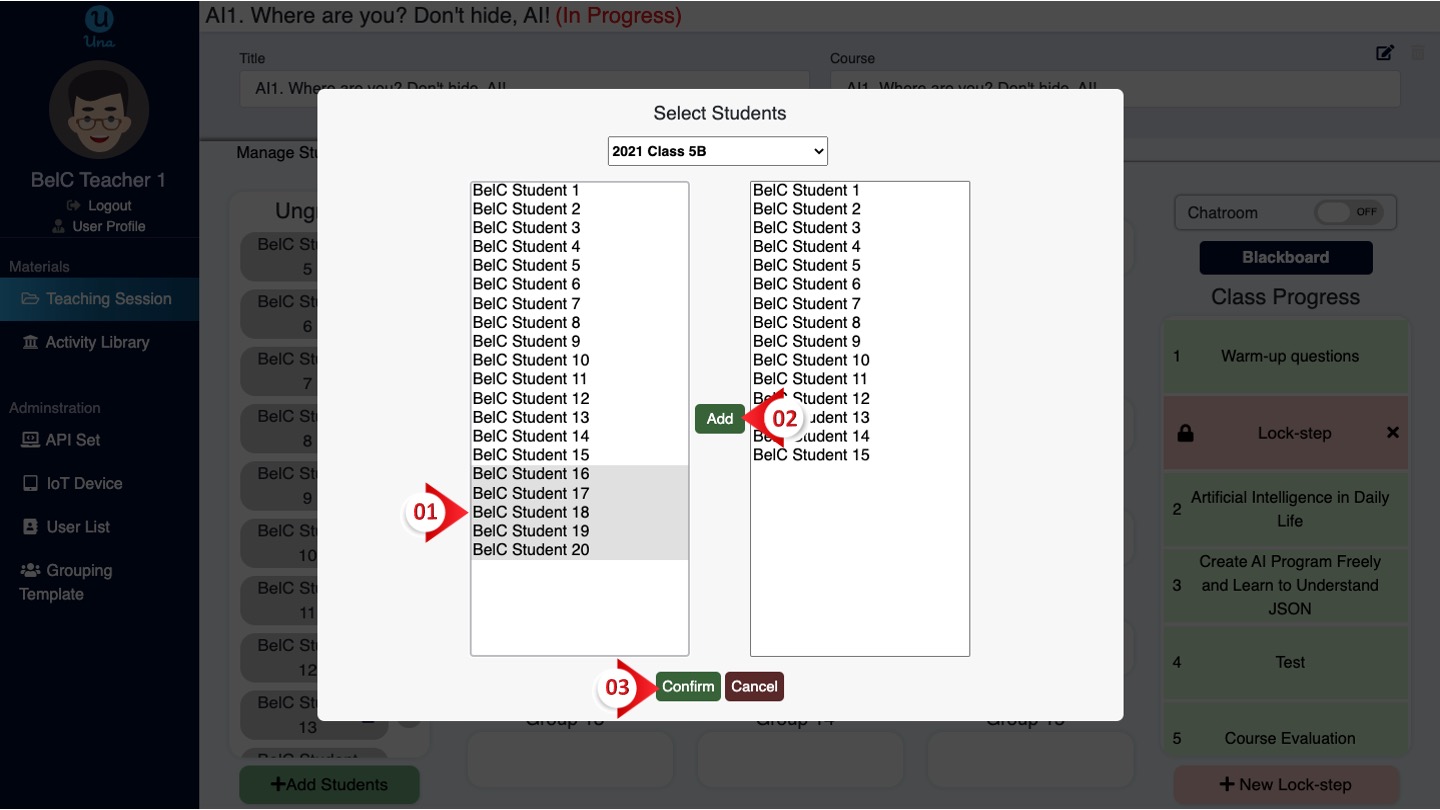
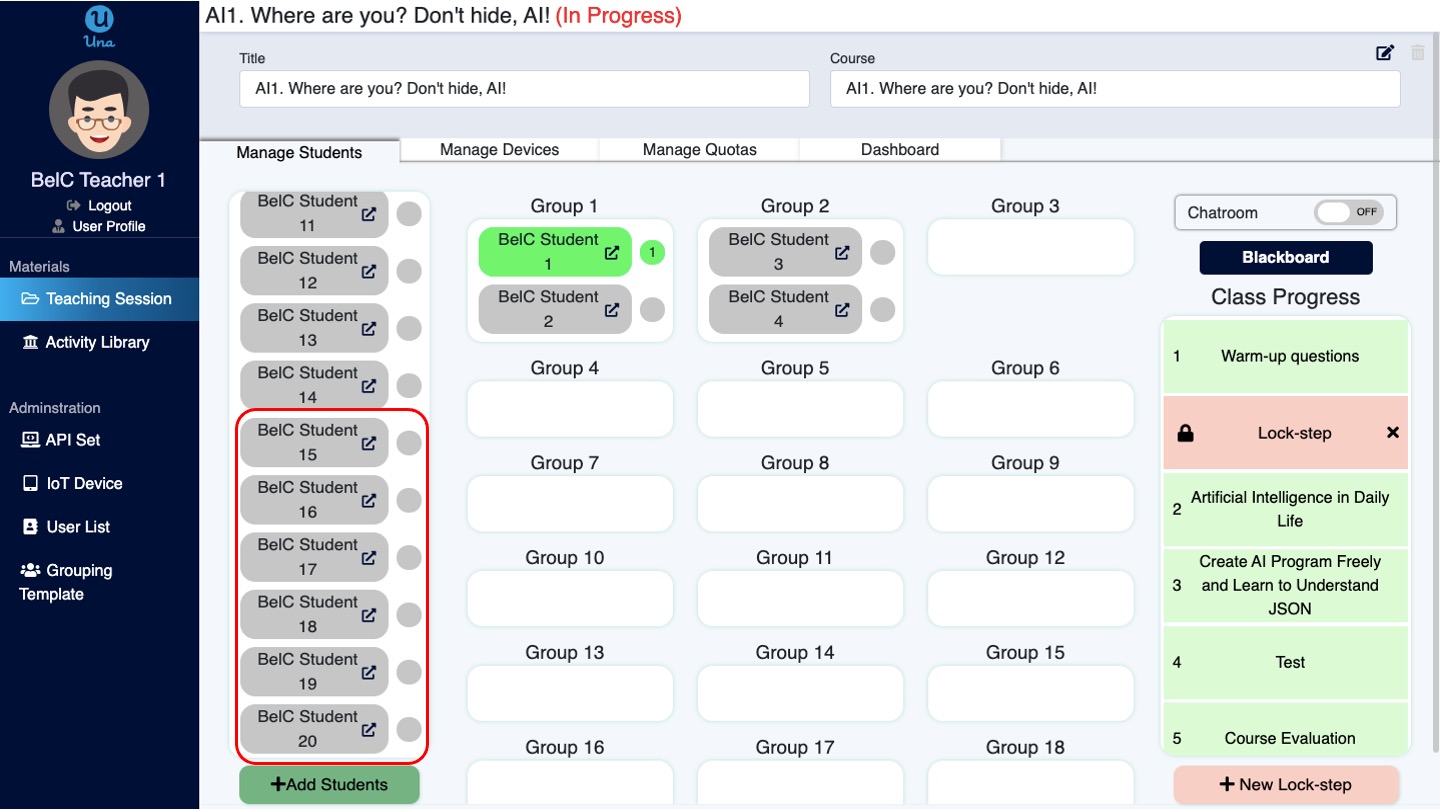
Add Students
If there are students who have not been added in the “Group Template”, you can add students on this page.
- Click the “+ Add Students” button
- Click on the menu to select the user list or directly select students
- Click “Add” after selecting all the students you need
- Click “Confirm” upon completion
When you complete, you will see the newly added students appear in “Ungrouped”.
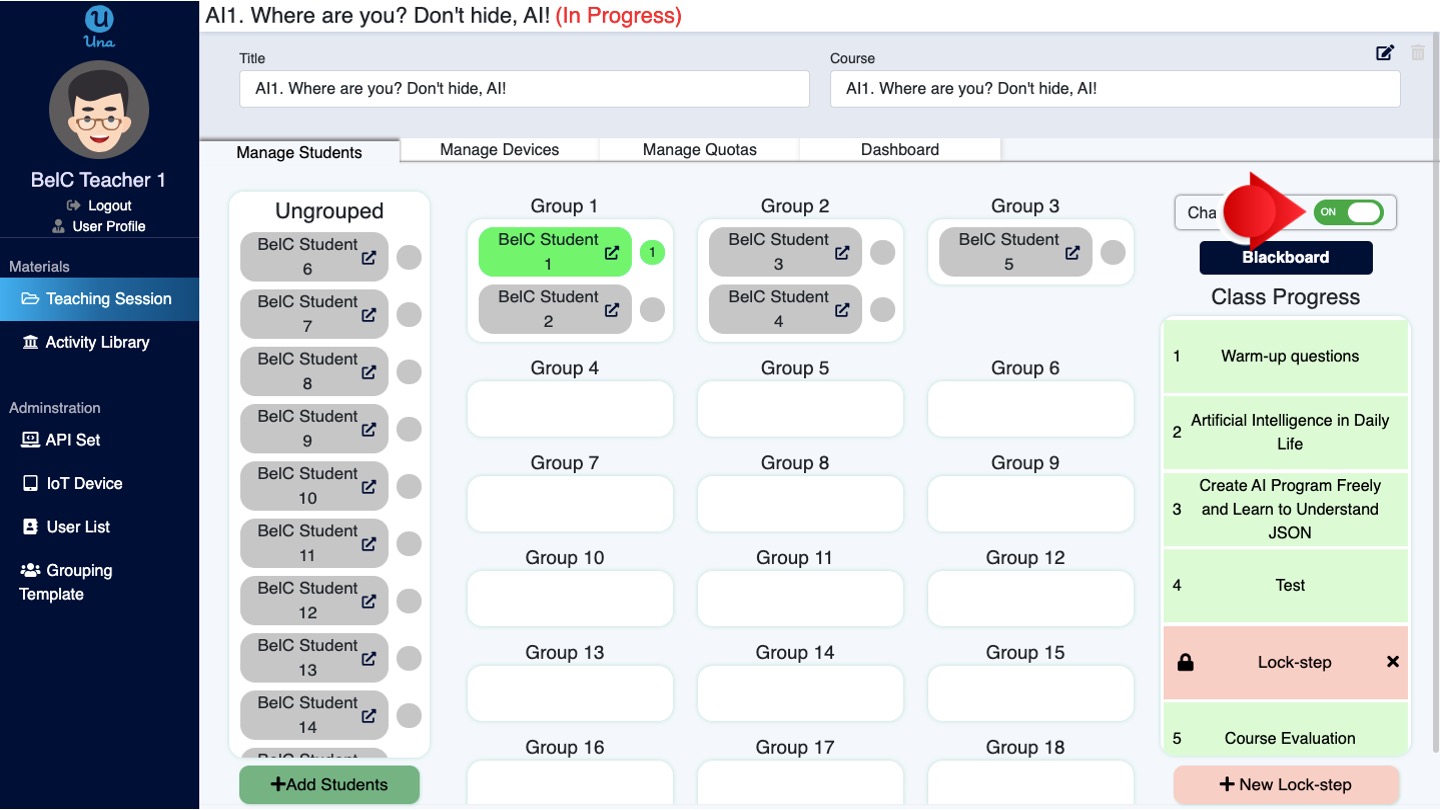
Chatroom
The teacher can press the button on the top right to choose whether to open the chat room for students who is in the same group to communicate. If it is successfully turned on, the button will turn green. Press again to close the chatroom.
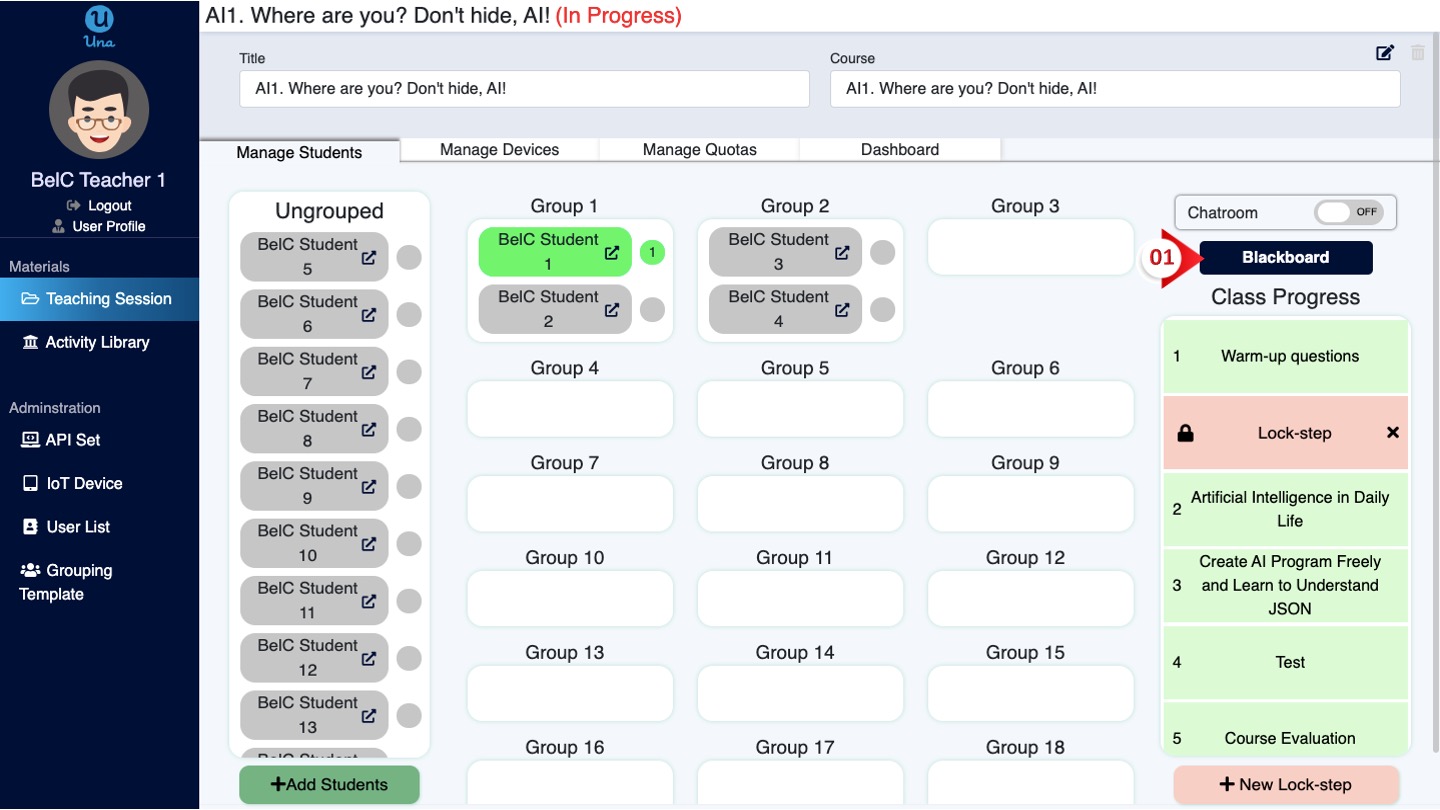
Blackboard
Teachers can use blackboards and task instructions to demonstrate and explain to students in class.
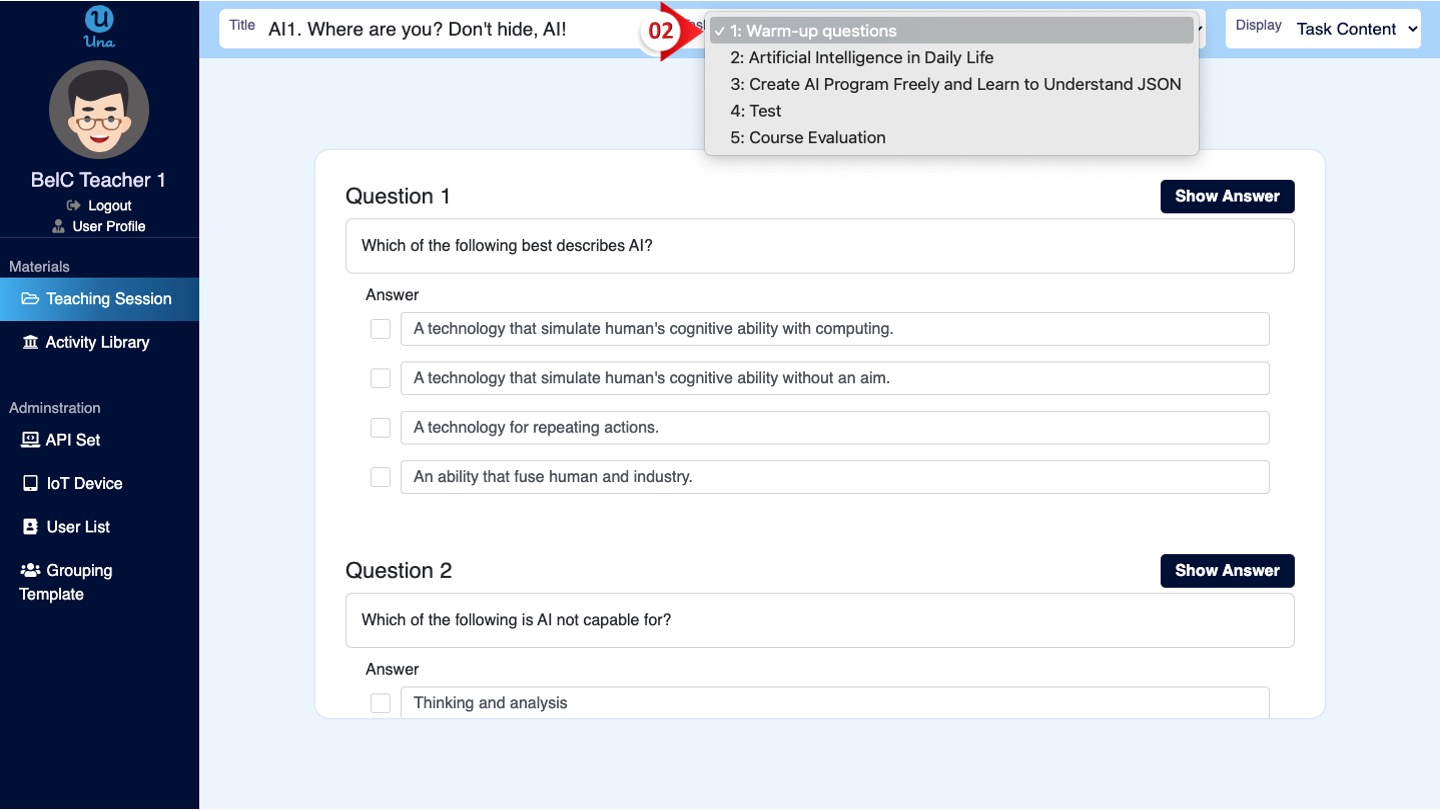
- Click the “Blackboard” button and a “Virtual Blackboard” pop-up window will show up
- Click the menu on the upper left-hand side to choose a task
- Choose the Task Content or Instructions from the menu on the upper right-hand side
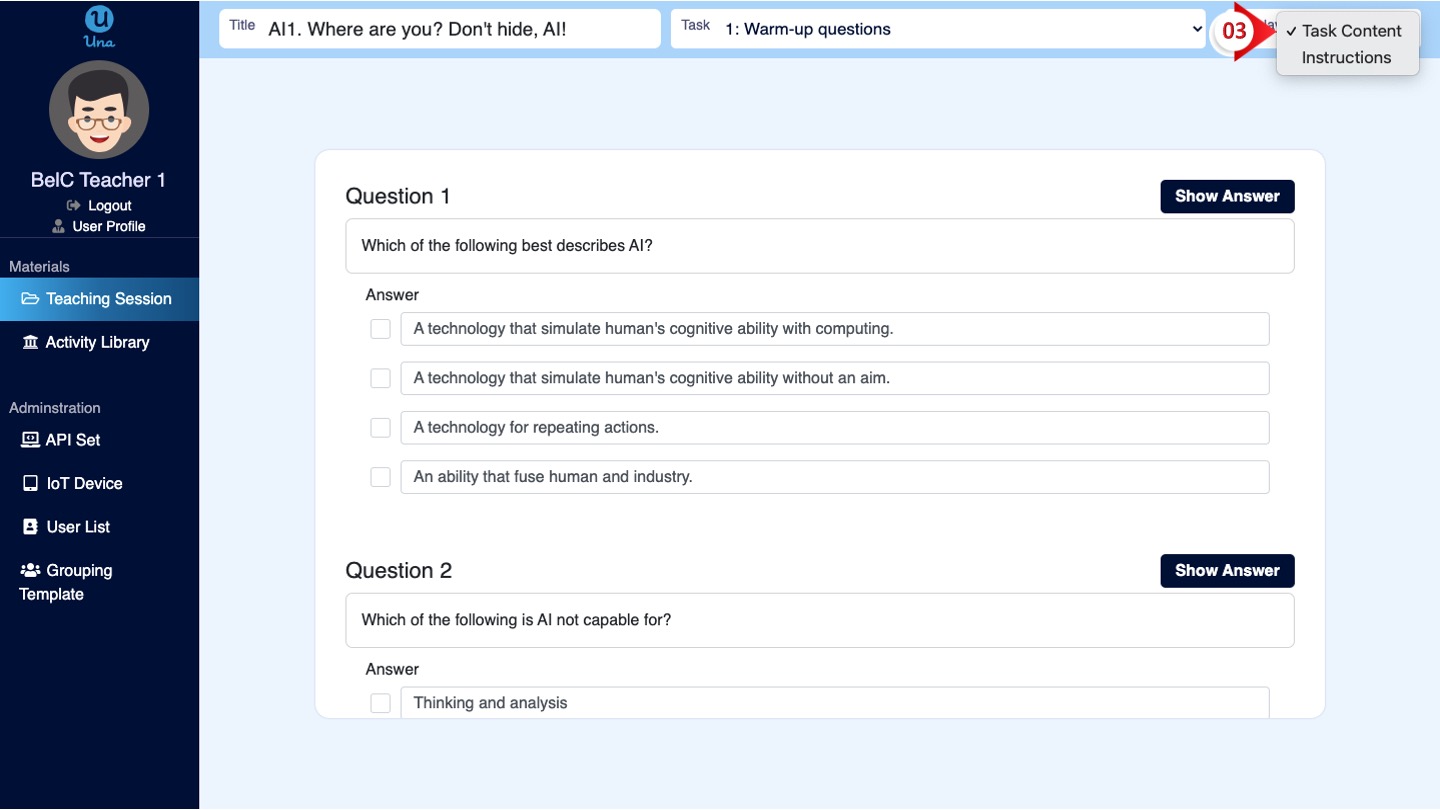
Task Content
Select “Task Content” from the menu on the right-hand side, you can use it to conduct demonstration.
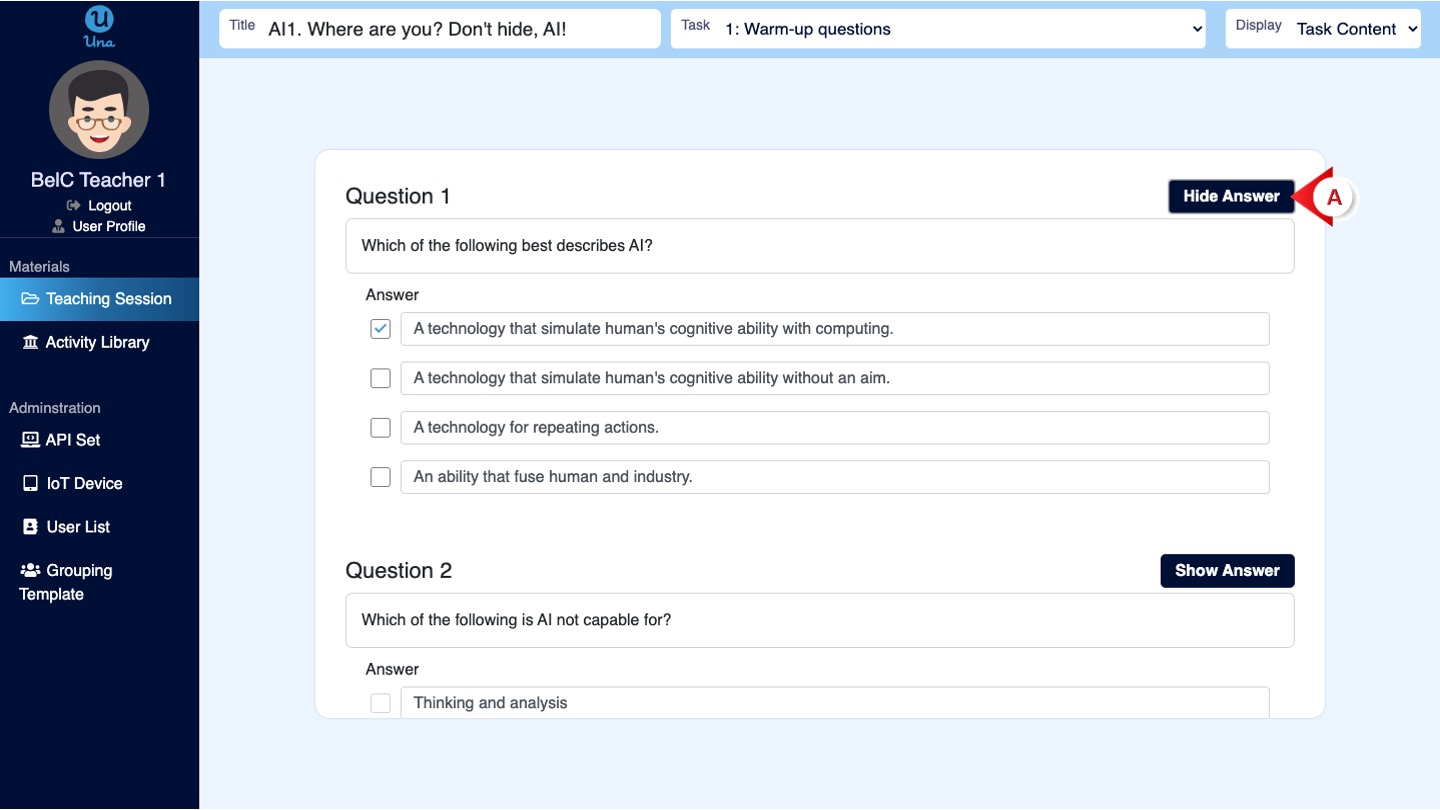
- Task Content
If you want to display the answer, press the “Show Answer” button next to the question. Then press the “Hide Answer” button to hide the answer.
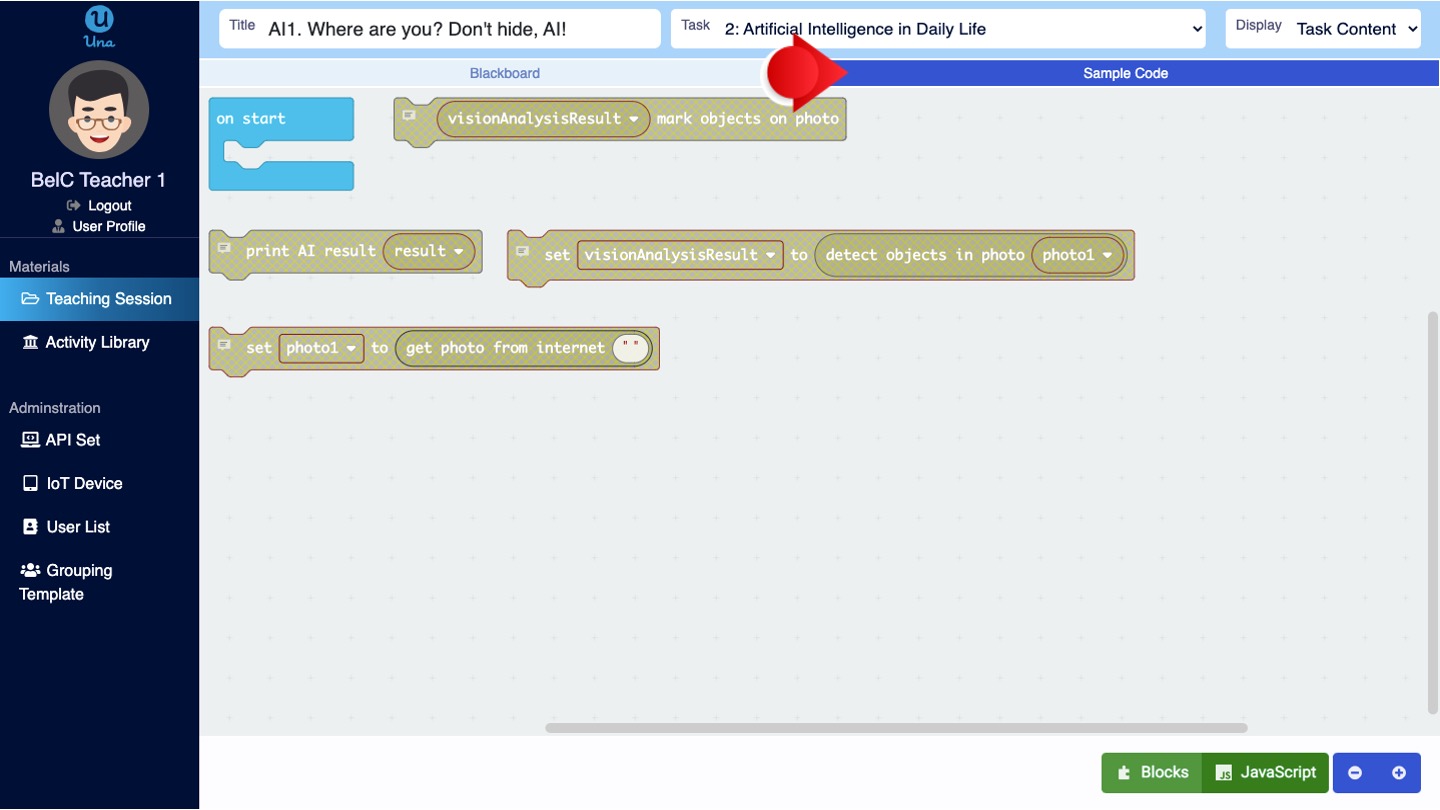
- Coding task
You can demonstrate to students on the blackboard. If the task has a sample code, press the “Sample Code” tab on the right side of the blackboard label to display the sample code of the task.
Task Instructions
In the menu on the right, select “Instruction”, you can use the Instructions to explain the task.

Lock-step
If you want to add a Lock-step in the class, you can press the “+ New Lock-step” button and drag it to the appropriate position. To delete a waiting point, you can click the cross button next to the “+ New Lock-step” button.